

Hello world, welcome to the second part!
In the previous part, I wrote about data collection and data generation. Here in this part I wanna continue with features preprocessing, label preprocessing, model training and model evaluation respectively. Let’s get started!
Step 3: Features preprocessing (using MFCC)
Raw audio wave that we extracted in step 1 using librosa is not really informative since it essentially only consists of one-dimensional data stored in an array. This array shape only represents the amplitude (loudness) of each bit. In fact, loudness is not the only feature that we want to take into account when we are about to distinguish different sounds. Instead, it is also necessary to consider the pitch of those audios. Therefore, in order to extract the pitch information based on given raw audio we are going to utilize a function called mfcc().
MFCC stands for Mel Frequency Cepstral Coefficients. There are so many papers out there related to sound classification and speech recognition which use this feature extraction method in order to obtain more information within audio data. In this article I will be more focusing on how the code work (since the math behind MFCC is very complicated — well, at least for me, lol). If you want to understand more about how to calculate MFCC I recommend you to read it from this page: https://haythamfayek.com/2016/04/21/speech-processing-for-machine-learning.html.
Anyway, remember our generated_audio_waves variable? Since it contains all the raw audio data, then we can simply use a for loop to iterate through all the values of the array and convert each of the waves into MFCC features. Here is my code for that:
mfcc_features = list()
for i in tqdm(range(len(generated_audio_waves))):
    mfcc_features.append(mfcc(generated_audio_waves[i]))
mfcc_features = np.array(mfcc_features)
Trending AI Articles:
1. Machine Learning Concepts Every Data Scientist Should Know
3. AI Fail: To Popularize and Scale Chatbots, We Need Better Data
Now that the MFCC features of all generated data are just stored in mfcc_features variable. If we check the shape before and after processing using mfcc() function like this:
print(generated_audio_waves.shape)
print(mfcc_features.shape)
Then, the output will be (5971, 44100) and (5971, 275, 13) respectively. It is pretty clear that the shape of generated_audio_waves represents the number of samples and the length of each audio samples in bits, in which 44100 is equivalent to 2 seconds. Now the shape of mfcc_features represents the number of audio data and the heatmap image with the size of 275 times 13 produced using mfcc() function. If you try to run the code below you will be able to compare the raw audio data with the MFCC-processed audio:
plt.figure(figsize=(12,2))
plt.plot(generated_audio_waves[30])
plt.title(generated_audio_labels[30])
plt.show()
plt.figure(figsize=(12, 2))
plt.imshow(mfcc_features[30].T, cmap='hot')
plt.title(generated_audio_labels[30])
plt.show()
In the code above I try to display 30th generated audio data, both the raw wave and its MFCC features, in which the outputs are the following two images. Notice the transpose (T) attribute that I apply on the MFCC features data. It is used because by default because mfcc() function outputs time step on its y-axis which makes us harder to compare the raw audio with its extracted features.
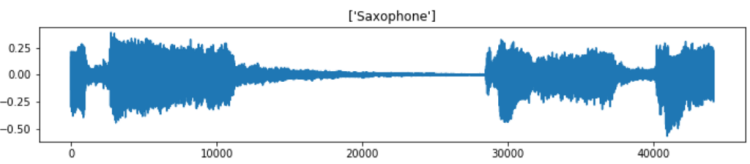

Well, it is quite difficult to interpret the MFCC features. But, the point is that, the heatmap image shows the frequency distribution within each time step where darker pixel represents lower energy and the lighter one shows higher energy. In fact, we can barely see that the silent part of the raw audio data (somewhere between bit number 15000 and 28000) gives slightly darker line on MFCC features approximately at timestep number 75 to 175. In the end of the day, we are going to perform classification on such heatmap images, so, it will be quite similar to image classification tasks in general.
We already got several variables by this far. Now, the two that we are going to use for model training are only mfcc_features (think of this as the X) and generated_audio_labels which contains all the labels (y) of each sample. In the next several steps we are going to actually train the model using these two variables (of course after encoding the label).

Step 4: Target/label preprocessing
Before constructing the neural network architecture, we still need to label-encode and one-hot-encode the labels of each sample. Remember that the values in our generated_audio_labels array are still in form of raw categorical data (i.e. cello, saxophone, acoustic guitar, double bass and clarinet), which is absolutely not acceptable by neural network. Therefore, my approach here is to utilize LabelEncoder() and OneHotEncoder() object coming from Sklearn module. The code implementation can be seen here:
label_encoder = LabelEncoder()
label_encoded = label_encoder.fit_transform(generated_audio_labels)
print(label_encoded)
Now if we try to print out the values of label_encoded, we will get the following output:
array([2, 1, 1, ..., 1, 3, 0])
It seems like that the encoding is working properly. But in fact, this is not acceptable by OneHotEncoder() object. The way to fix this problem is to modify its shape like this:
label_encoded = label_encoded[:, np.newaxis]
label_encoded
Now that label_encoded is ready to be one-hot-encoded as it is already shaped like the following:
array([[2],
       [1],
       [1],
       ...,
       [1],
       [3],
       [0]])
Next, the values of label_encoeded will be converted into one hot representation. Things are getting extremely simple when I use OneHotEncoder() object that I don’t even need to iterate through all labels manually. The implementation is quite similar to LabelEncoder().
one_hot_encoder = OneHotEncoder(sparse=False)
one_hot_encoded = one_hot_encoder.fit_transform(label_encoded)
one_hot_encoded
After running the code above, we should get an output like below.
array([[0., 0., 1., 0., 0.],
       [0., 1., 0., 0., 0.],
       [0., 1., 0., 0., 0.],
       ...,
       [0., 1., 0., 0., 0.],
       [0., 0., 0., 1., 0.],
       [1., 0., 0., 0., 0.]])
Step 5: Model training (using CNN)
Before training the model, I convert mfcc_features and one_hot_encoded into X and y respectively to make things look more intuitive. Next, I also normalize the values of all samples using standard normalization formula. Lastly, the data are split into train and test in which the test size is taken from 20% of the entire dataset. This train-test split is important to find out whether our model suffers overfitting. Below is the implementation of that:
X = mfcc_features
y = one_hot_encoded
X = (X-X.min())/(X.max()-X.min())
X_train, X_test, y_train, y_test = train_test_split(X, y, test_size=0.2)
Now, the input shape of the neural net is defined as follows:
input_shape = (X_train.shape[1], X_train.shape[2], 1)
If you try to print out that input_shape, the result will be (275, 13, 1). Notice that the number 1 in the shape (last shape axis) should be there because it is just what is expected by Conv2D() layer in our neural network. Hence, we also need to reshape both X_train and X_test to be in that shape as well.
X_train = X_train.reshape(X_train.shape[0], X_train.shape[1], X_train.shape[2], 1)
print(X_train.shape)
X_test = X_test.reshape(X_test.shape[0], X_test.shape[1], X_test.shape[2], 1)
print(X_test.shape)
When you run the code above, you will have the output of (4776, 275, 13, 1) and (1195, 275, 13, 1) respectively. Here we know that we got 4776 samples for training and 1195 samples for testing.
Now it’s time to actually build the Convolutional Neural Network (CNN) classifier. The reason why I use CNN is because this architecture is usually considered as one of the best — if it is not the best — to solve image classification task. And in our case here, the images are in form of heatmap like what I displayed earlier. The complete architecture implementation is shown below along with the loss function and optimizer.
model = Sequential()
model.add(Conv2D(16, (3, 3), activation='relu', strides=(1, 1),
    padding='same', input_shape=input_shape))
model.add(Conv2D(32, (3, 3), activation='relu', strides=(1, 1),
    padding='same'))
model.add(MaxPool2D((2, 2)))
model.add(Dropout(0.5))
model.add(Flatten())
model.add(Dense(128, activation='relu'))
model.add(Dropout(0.5))
model.add(Dense(64, activation='relu'))
model.add(Dropout(0.5))
model.add(Dense(5, activation='softmax'))

model.compile(loss='categorical_crossentropy',
     optimizer='adam',
     metrics=['acc'])
It might be important to keep in mind that categorical cross entropy loss function is used in this case because we are dealing with multiclass classification. Whereas, Adam optimizer is also chosen because I think it is just the best one right now.
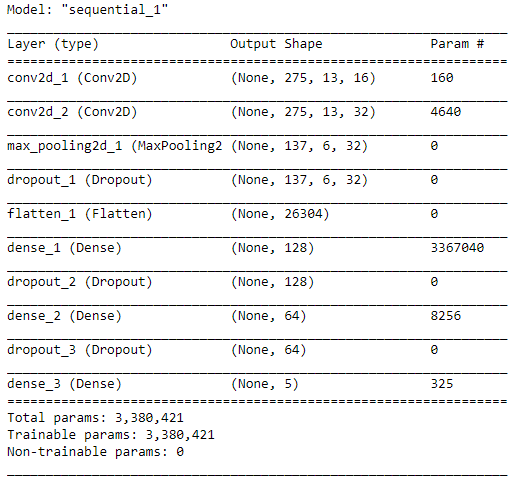
When we run model.summary(), the details of this architecture appears like the following figure. We can see here that the number of params is pretty large.
After compiling the model, now our CNN is ready to train. Here I decided to go with 30 epochs, which hopefully will be enough to obtain high accuracy. I ran the code below to start training the model. Also, note that I put the entire training process into history variable which will be useful to track the progress.
history = model.fit(X_train, y_train, epochs=30, validation_data=(X_test, y_test))
And below is how the process goes. I skipped most of those epochs to make things look tidier. By the way it took my computer around 5 minutes to fit the model. Be patient!
Train on 4768 samples, validate on 1192 samples
Epoch 1/30
4768/4768 [==============================] - 10s 2ms/step - loss: 1.4365 - acc: 0.3473 - val_loss: 1.1578 - val_acc: 0.5529
.
.
.
Epoch 10/30
4768/4768 [==============================] - 7s 1ms/step - loss: 0.6428 - acc: 0.7664 - val_loss: 0.5620 - val_acc: 0.8020
.
.
.
Epoch 20/30
4768/4768 [==============================] - 7s 1ms/step - loss: 0.4469 - acc: 0.8349 - val_loss: 0.4510 - val_acc: 0.8582
.
.
.
Epoch 30/30
4768/4768 [==============================] - 7s 1ms/step - loss: 0.3470 - acc: 0.8729 - val_loss: 0.3962 - val_acc: 0.8842
Well, after several minutes of waiting, finally we got the final result. We can see here that the accuracy scores in the last epoch are 87% and 88% towards training and testing data respectively.
We can also see the improvement of the model goes at every epoch using Matplotlib to make things look clearer. The code below is used to display both loss value decrease and accuracy score improvement.
plt.figure(figsize=(8,8))
plt.title(‘Loss Value’)
plt.plot(history.history[‘loss’])
plt.plot(history.history[‘val_loss’])
plt.legend([‘loss’, ‘val_loss’])
print(‘loss:’, history.history[‘loss’][-1])
print(‘val_loss:’, history.history[‘val_loss’][-1])
plt.show()
plt.figure(figsize=(8,8))
plt.title('Accuracy')
plt.plot(history.history['acc'])
plt.plot(history.history['val_acc'])
plt.legend(['acc', 'val_acc'])
print('acc:', history.history['acc'][-1])
print('val_acc:', history.history['val_acc'][-1])
plt.show()
And the output looks something like the two images below.


According to the two graphs above, we can see that our model is performing pretty well as it reaches the final accuracy of 87% and 88% towards train and test data respectively. Also, both loss values are also decreasing as the the number of epoch increases. Therefore, we can conclude that this CNN classifier does not suffer overfitting at all!
Step 6: Model evaluation
Now let’s get deeper into the CNN model. In order to evaluate the performance of the model better, we are going to predict both train and test data again, but in a different session with the training process. Here I would like to start predicting the test data first.
predictions = model.predict(X_test)
After running the code above, now predictions variable holds all the predicted class of each sample in X_test, but still in form of probability values. For example prediction values of the first sample (predictions[0]) looks like this:
array([3.0511815e-06, 2.2099694e-05, 9.9997330e-01, 1.0746862e-12,
       1.5381156e-06], dtype=float32)
What it actually says is that the class of index 2 holds the highest probability since it has the score of >0.9 while other indices only has <0.1 score. Hence, the prediction of this sample falls to class [0, 0, 1, 0, 0]. Now if we take the argmax of that array, we are going to obtain the value of 2, where this number represents the sound of a clarinet.
The code below shows how to take the argmax of all predictions on X_test and then followed by decoding y_test into the same form as the predictions variable (because previously we already converted y_test into one-hot representation, now we need to convert that back to label-encoded form). This is extremely necessary to do because we want to compare each of the element of predictions and y_test.
predictions = np.argmax(predictions, axis=1)
y_test = one_hot_encoder.inverse_transform(y_test)
As predictions and y_test are now comparable, we can start to create a confusion matrix to evaluate the model performance better. Here we are going to use confusion_matrix function taken from Sklearn module. The implementation looks like this:
cm = confusion_matrix(y_test, predictions)
plt.figure(figsize=(8,8))
sns.heatmap(cm, annot=True, xticklabels=label_encoder.classes_, yticklabels=label_encoder.classes_, fmt='d', cmap=plt.cm.Blues, cbar=False)
plt.xlabel('Predicted Label')
plt.ylabel('True Label')
plt.show()
After running the code above, we should get an output like the following image:

Using the confusion matrix above, we are able to know which class makes our CNN confused. Let’s take a look at saxophone true label (last row). Here we can see that 186 samples are predicted correctly, while 20 other saxophone samples are predicted as clarinet. Hence, we can guess that probably our classifier sometimes get difficulty to distinguish the sound of saxophone and clarinet.
That’s all of musical instrument sound classification project. I hope you learn something new from this article. See you in the next one!
And here is the code I promised earlier:)
Don’t forget to give us your ? !


Musical Instrument Sound Classification using CNN (Part 2/2) was originally published in Becoming Human: Artificial Intelligence Magazine on Medium, where people are continuing the conversation by highlighting and responding to this story.
