
In this OpenCV C++ tutorial article, we will learn how to calculate approximately the surface area of a random shape using various aspects of Computer Vision with OpenCV.
OpenCV is a set of libraries that can empower the software we are using or making today. Learning OpenCV is one of a good asset to the developer to improve aspects of coding and also helps in building a software development career.
Requirements
For a better understanding of this tutorial, you will need to know the basics of C++, have an idea about OpenCV and how it works and enjoy programming ?, but it’s fine because I will provide you with a complete code ready to run.
Before we dive in, you can have a read about :
Introduction to OpenCV ( this link uses OpenCV for Python, but it provides a very good information about how OpenCV really do it’s magic. )
https://medium.com/edureka/python-opencv-tutorial-5549bd4940e3
Setup OpenCV C++ with VSCode ( yes, it’s one of the best source code editor)
https://medium.com/analytics-vidhya/vs-code-with-opencv-c-on-windows-10-explained-256418442c52
The idea behind
Before we begin, the idea behind this project was to automate the quality assurance of some 3D printed parts. Giving vision to the computer to automate this process made us gain enormous amount of money and time and the result was actually great, not too precise, but enough for our use case.
How ?
Okay, now that we introduced the use case, how will we achieve this ?
We will use a reference object that we know it’s surface area in advance, proportion it on the target object, and we will have the wanted surface area. Easy, right ?
This looks waaaay too simple. Let’s dive into a more detailed explanation.

Explanation
So the reference object will be our “marker” which will be extracted in the first place. Using OpenCV’s tools, we will count the number of pixels that covered the marker and use them to estimate the surface using the pixel area that drew the target object.
Some key factors could change the overall result of the surface area calculator using camera photos.
Perspective angle
Represent the position of the camera used to take a photo of the target. Normally, with a hand camera, the angle of the shot is not perpendicular which results in a slightly (or extremely) distorted image. Calculate the surface area with a distorted image will affect our result badly. This is one of the most difficult issues that we faced in order to achieve a good result without the need to firmly adjust the camera position.
There’s a tone of algorithms to fix the perspective angle of the image, this process is called perspective correction. Have a read about it here :
Homography Examples using OpenCV ( Python / C ++ )
Or here
4 Point OpenCV getPerspective Transform Example – PyImageSearch
But today we will focus on our method to achieve a result which is slightly independent of perspective angle.
Plan
In this tutorial we will go through 3 main parts :
- Preprocess the image for contour extraction
- Recognize the reference object from image and estimate its surface area
- Random Shape Detection & Surface area evaluation of the target’s
At the end of this write-up, you will learn how to calculate the surface area of a 2D object using OpenCV.
Trending AI Articles:
1. Microsoft Azure Machine Learning x Udacity — Lesson 4 Notes
2. Fundamentals of AI, ML and Deep Learning for Product Managers
Image preprocessing for contour detection
Basically a contour is a closed curve joining all the continuous pixels having a color or an intensity. A contour represents the shape of an object found in an image. Contour detection in OpenCV is a basic set of operations that repeats itself, but needs some tweaks depend on the use case.
Here is the pipeline that we’re going to apply to successfully detect and extract our main object from the image.
- Convert the image from RGB to a binary image
- Erosion and dilation using cv::morphologyEx
- Threshold
Before and After preprocessing
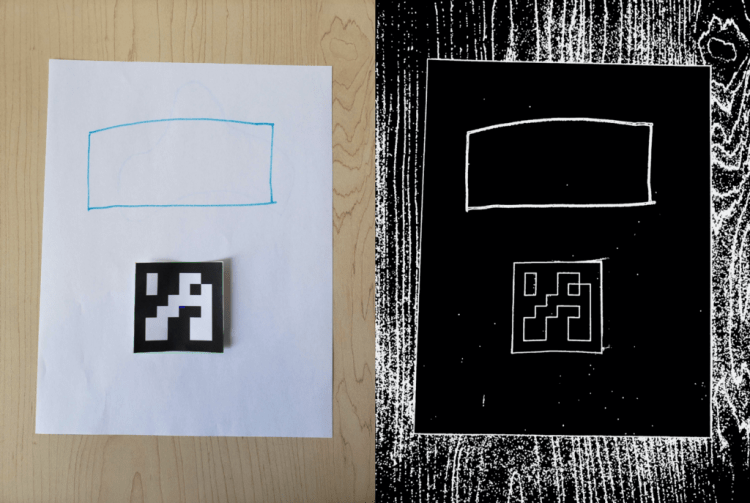
As you can see, the second image looks way better for contour detection.
Recognize the reference object from image and estimate it’s surface area
For the reference object detection, we will use a library which was designed to determine camera pose specifically, but make reference object detection really simple, ArUco Markers.

An ArUco marker is a synthetic square marker composed by a wide black border and an inner binary matrix which determines its identifier.
Reminder — This marker will be printed and put next to the target, identify it and use it’s known surface to calculate the target area.
Generating ArUco Marker
… or use this link https://chev.me/arucogen/ ?
Identifying a marker as a reference object
Now that we generated a marker we will need to place it besides our target object.
To detect the reference object in our image we will use ArUco library method detectMarkers() which takes a source image, a dictionary used for generation, object corners, an array of int to stores the ArUco containing identifiers.
Reference object surface calculation
OpenCV does provide us with a method to calculate the non-zero pixels area of a contour called cv::contourArea(). Basically, we will determine the area of one pixel using the inverse rule of three.

Random Shape Detection & Surface area evaluation of the target’s
Here comes the tricky part. We will have to detect our object from the image to perform area evaluation. Object recognition is a vast domain where you can use different technology to successfully recognize your target, Image classification using Deep Learning, Tagging. It will depend mostly on the use case. For this tutorial, we will keep things simple and try to recognize objects from an image using their contour. You can run some test and see if this detection method will satisfy your needs or else you will have to build your own Neural network, train a model and use it with a Machine Learning library.
Take a look at Google’s Teachable Machine
Let’s get back to work. Ok, once done with our reference object recognition, and we approximately evaluate it’s surface, we will loop through the coutours found by use OpenCV’s findContours() method and evaluate each of their surfaces.
The result printed on the input image
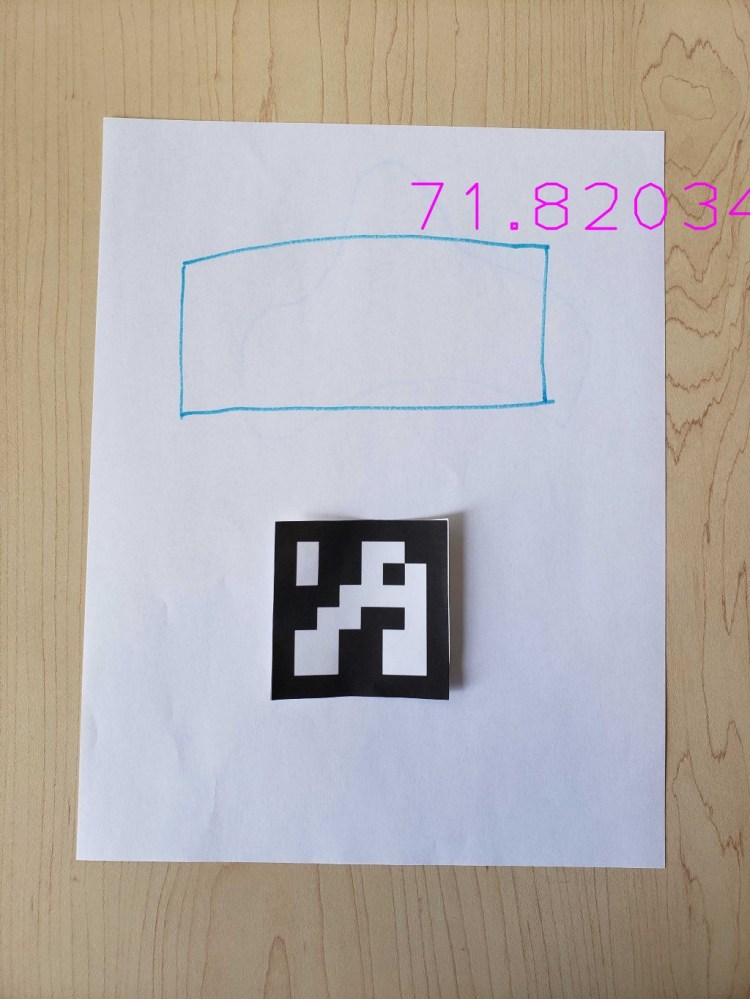
Through this tutorial, we’ve been able to perform image processing, object recognition and use image metadata to calculate real life area surface. As mentioned in the beginning, here is a link to the code snippet, documented, where you can copy paste it and try it. First run this snippet with GENERATE_REF true, to generate the reference object, print it, put it next to the target object and then with INPUT_FILE and GENERATE_REF false rerun the code.
In this code, I used cv::im_write and cv::putText for debugging purpose.
I think we reached a good result, but steps, calibration and enhancements can be added to the process. I encourage you to play around with the recognition parameters, thresholds and different methods of edge detection and see which works the best for your case. If you make it work, I will be happy if you share your result in the comment section below, but if you didn’t or have any trouble setting up this code for running, I will be glad to help you out.
Thanks for reading. I hope you enjoyed it and learned something new.
Don’t forget to give us your ? !


Surface area calculator using OpenCV was originally published in Becoming Human: Artificial Intelligence Magazine on Medium, where people are continuing the conversation by highlighting and responding to this story.
