

Hello world, this is Ardi! So in this writing I wanna show you how to construct a Neural Network using both sequential and functional model. As far as I know most of Neural Network tutorials out there are using sequential model, probably because it is more intuitive for simple architectures, even though in fact Functional model is actually not that complicated.
Here is my plan for this article: I will be using Fashion MNIST dataset which consists of 60000 train data and 10000 test data, in which each of those images have the size of 28 by 28 pixels (similar to MNIST Digit dataset). Next, two exact same classifier model will be created and trained. The first one is done using sequential style while the second one is using functional style. Lastly I will explain a bit why it is important to get familiar with functional style, especially if you’re interested to learn more about Neural Network-based models. So that’s it, let’s start doing this little project.
Note: scroll to the last part of this writing to get the fully-working code.
As usual, the first thing to do is to import all required modules. Notice that the Fashion MNIST dataset is already available in Keras, and it can just be loaded using fashion_mnist.load_data() command.
import numpy as np
import matplotlib.pyplot as plt
from keras.utils import to_categorical
from keras.datasets import fashion_mnist
from keras.models import Sequential, Model
from keras.layers import Dense, Input
# Loading MNIST Fashion dataset
(X_train, y_train), (X_test, y_test) = fashion_mnist.load_data()
By the way you can show the first several images of the MNIST dataset using the following code:
fig, axes = plt.subplots(ncols=7, sharex=False,
                         sharey=True, figsize=(16, 4))
for i in range(7):
    axes[i].set_title(y_train[i])
    axes[i].imshow(X_train[i], cmap='gray')
    axes[i].get_xaxis().set_visible(False)
    axes[i].get_yaxis().set_visible(False)

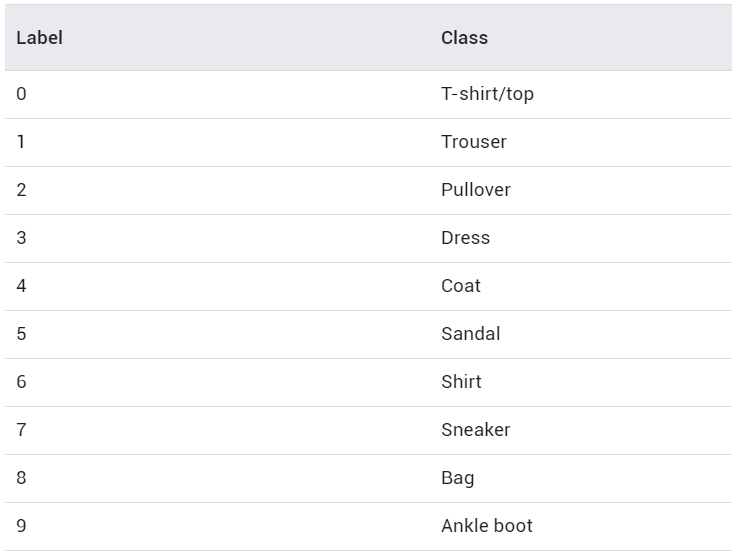
After running the code above, you should get an output of the first 7 images in the dataset along with the labels. As you can see the image below, those labels are already mapped to a particular number. If you check Keras documentation, you will be able to find out what those numbers actually mean (I also display it below).

Preprocessing
Let’s get back into our X variables. Initially, each of the images stored in X_train and X_test is in form of 2-dimensional array with the shape of (28, 28), in which this size represents the height and width of the handwritten digit images. Before training the model, we need to flatten all those images first. It can be achieved by using NumPy reshape() function. The argument passed in this function represents the new shape that we want, in this case it’s (number of data, 28*28).
# Reshape all images (from 28x28 to 784)
X_train = X_train.reshape(X_train.shape[0],X_train.shape[1]*X_train.shape[2])
X_test = X_test.reshape(X_test.shape[0],X_test.shape[1]*X_test.shape[2])
After running the code above, our X_train and X_test should have the shape of (60000, 784) and (10000, 784) respectively. Next, we also need to turn the target label (both y_train and y_test) into one-hot format. Use the following code to do that:
# Convert label to one-hot representation
temp = []
for i in range(len(y_train)):
    temp.append(to_categorical(y_train[i], num_classes=10))

y_train = np.array(temp)
temp = []
for i in range(len(y_test)):
    temp.append(to_categorical(y_test[i], num_classes=10))
y_test = np.array(temp)
Up to this stage we have already converted all train and test data along with its labels into the correct shape for our Neural Network model. So now we can start to construct the model architecture, I will start with Sequential model first.
Sequential Model
The first thing to do when we are about to create a sequential model is to initialize it first. The code below shows that we are initializing a new model called model_seq.
model_seq = Sequential()
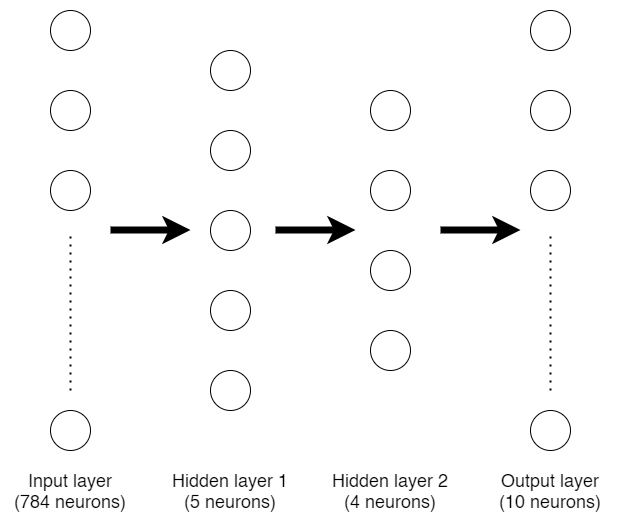
Initially, this model_seq variable is just an empty Neural Network model until we add more layers sequentially starting from the beginning. Now I wanna create a Neural Network architecture like the one drawn in the figure above. To add layers into the model, we can use the following code.
model_seq.add(Dense(5, activation='sigmoid', input_shape (X_train.shape[1],)))
model_seq.add(Dense(4, activation='sigmoid'))
model_seq.add(Dense(10, activation='softmax'))
The first layer that we add to model_seq is a dense (a.k.a. fully-connected) layer with 5 neurons. Keep in mind that the first layer added in a sequential model is not the input layer, it is our first hidden layer instead. The input layer is defined using input_shape argument, in this case I passed the shape of X_train variable which has the value of 784 (this is the number of our flattened image pixels).
Next, I add more hidden layer which consists of 4 neurons and an output layer of 10 neurons. Remember that we have 10 labels for this classification problem, so we need to use 10 neurons as well for the output layer.
Now since we already done constructing the architecture, we can print out the summary of the model simply by using model_seq.summary() command which directly gives output like this:
Model: "sequential_1"
_________________________________________________________________
Layer (type)                 Output Shape              Param #
=================================================================
dense_1 (Dense)              (None, 5)                 3925
_________________________________________________________________
dense_2 (Dense)              (None, 4)                 24
_________________________________________________________________
dense_3 (Dense)              (None, 10)                50
=================================================================
Total params: 3,999
Trainable params: 3,999
Non-trainable params: 0
_________________________________________________________________
After that, we can compile and train the model using our X_train and y_train data pairs. I decided to use categorical cross entropy loss function and Adam optimizer with 3 epochs.
model_seq.compile(loss='categorical_crossentropy',
                  optimizer='adam',
                  metrics=['acc'])
model_seq.fit(X_train, y_train, epochs=3,
              validation_data=(X_test,y_test))
Here is the training process:
Train on 60000 samples, validate on 10000 samples
Epoch 1/3
60000/60000 [==============================] - 11s 192us/step - loss: 1.9896 - acc: 0.2353 - val_loss: 1.7272 - val_acc: 0.2710
Epoch 2/3
60000/60000 [==============================] - 11s 176us/step - loss: 1.6551 - acc: 0.2847 - val_loss: 1.5734 - val_acc: 0.2887
Epoch 3/3
60000/60000 [==============================] - 11s 182us/step - loss: 1.5608 - acc: 0.2886 - val_loss: 1.5200 - val_acc: 0.2886
That’s the end of the training process on sequential model. You might notice that the accuracy is very low and at the same time the loss is very high, but it’s not the point of this writing! Here I just wanna show you how to construct a Neural Network using sequential and functional style.
So now let’s talk about the next one.
Functional Model
Functional model offers more flexibility because we don’t need to attach layers in sequential order. The code below shows the steps of creating the exact same model in functional way.
input1 = Input(shape=(X_train.shape[1],))
hidden1 = Dense(5, activation='sigmoid')(input1)
hidden2 = Dense(4, activation='sigmoid')(hidden1)
output = Dense(10, activation='softmax')(hidden2)
The first thing to do is to create the input layer, here I use input1 variable to define it. Also, don’t forget to pass the initial shape, in this case I use the shape of our X_train we defined earlier which has the size of 784 neurons.
In the next line, I create another variable namely hidden1 as the first hidden layer. Notice that I use dense layer with 5 neurons (exactly the same as our sequential model). To attach this layer with the input layer, we need to explicitly write input1 variable in the end of this line. After that, I define hidden2 as the second hidden layer which has 4 neurons and connects it to hidden1 using the same method. The last layer I wanna create in this model is the output layer with 10 neurons which connects to hidden2 layer.
Now, the final step of using functional style is to initialize the entire architecture. It can be achieved using Model() function along with its parameters which defines the input and output layer.
model_func = Model(inputs=input1, outputs=output)
Up to this stage we have already had two exact same Neural Network model. The first one was done previously using sequential style, while this one we just done it using functional style. When we run model_func.summary(), we will get the following output:
Model: "model_1"
_________________________________________________________________
Layer (type)                 Output Shape              Param #
=================================================================
input_1 (InputLayer)         (None, 784)               0
_________________________________________________________________
dense_4 (Dense)              (None, 5)                 3925
_________________________________________________________________
dense_5 (Dense)              (None, 4)                 24
_________________________________________________________________
dense_6 (Dense)              (None, 10)                50
=================================================================
Total params: 3,999
Trainable params: 3,999
Non-trainable params: 0
_________________________________________________________________
If we pay attention to the initial layer summary of both sequential and functional model, we will see that the input layer is not written in our sequential model. But this is completely fine as this input layer does not contain any params (weights), and hence does not affect the total number of params. You can see that in this case both models have 3999 params.
Next, we can continue to compile and train the model using the same procedure as the sequential model:
model_func.compile(loss='categorical_crossentropy',
                   optimizer='adam',
                   metrics=['acc'])
model_func.fit(X_train, y_train, epochs=3,
               validation_data=(X_test,y_test))
And here is how the training process goes:
Train on 60000 samples, validate on 10000 samples
Epoch 1/3
60000/60000 [==============================] - 10s 171us/step - loss: 2.0317 - acc: 0.2806 - val_loss: 1.7200 - val_acc: 0.3612
Epoch 2/3
60000/60000 [==============================] - 10s 173us/step - loss: 1.4941 - acc: 0.3679 - val_loss: 1.4399 - val_acc: 0.3751
Epoch 3/3
60000/60000 [==============================] - 10s 173us/step - loss: 1.3732 - acc: 0.3729 - val_loss: 1.3286 - val_acc: 0.3732
Again, I don’t really care about the accuracy and loss value for now. But, if you do care about it, you may increase the number of layers, neurons or epochs. Theoretically those things may help improving model accuracy.
So that’s it, now that you should be able to construct a Neural Network using both sequential and functional style. Personally, I prefer to use sequential style because most of the tutorials were using this kind of style when I started to learn implementing Neural Network, and I’ve been really comfortable with it until now. However though, it is also important to know how to do it using functional style since you can get more flexibility. For example, in sequential model you can only stack one layer after another, while in functional model you can connect a layer to literally any other layer.
Thanks for reading! I hope this article makes you learn something new!
And here is the entire code used in this project 🙂
Don’t forget to give us your ? !


Sequential vs Functional Model in Keras was originally published in Becoming Human: Artificial Intelligence Magazine on Medium, where people are continuing the conversation by highlighting and responding to this story.
