
Introduction
Keras is a high-level Python API to build Neural networks, which has made life easier for people who want to start building Neural networks all the way to researchers.
Use Case
With this project, I want to address a problem that all of us have: too many Whatsapp images and no way to sort them. As an initial experiment, I made a model that differentiates pictures of people from memes, so that they can be labelled or moved to be stored separately (currently working, hopefully there will be a part 2).
Keras is a BIG library, and thus many of it’s useful functions fly under the radar. In this post, I explore two of such functions:
ImageDataGenerator
ImageDataGenerator is a powerful tool that can be used for image augmentation and feeding these images into our model. The augmentation takes place in memory, and the generators make it very easy to setup training and testing data, without the need of manual labeling of the images
Transfer Learning
Transfer learning is a popular technique, especially while using CNNs for computer vision tasks. In transfer learning, we take a big model that has already been trained for days (even weeks) on a huge dataset, use the low-level features it has learned and fine-tune it to out dataset to obtain a high level of accuracy.

Combined, ImageDataGenerators and Transfer Learning drastically reduce both:
- The amount of data required to train the model
- The amount of time required to setup our own data
Setting up our Data
To use the ImageDataGenerator, we set up our data on our machine in a specific directory structure. We then point the generators to these directories in the code, to tell them where they can fetch the images from.
The directory structure for our task looks like this:
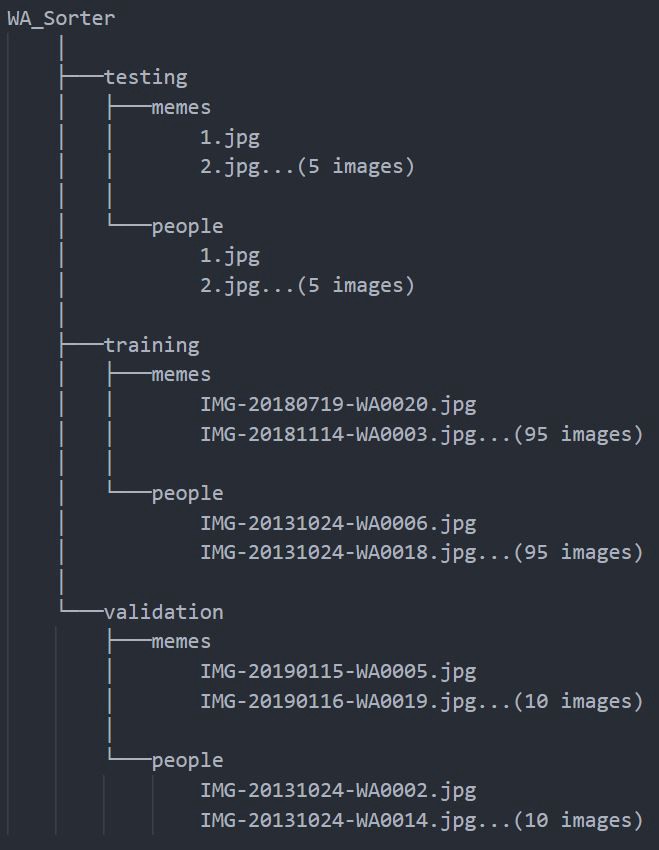
As you can observe, I use only 110 images of each class. I can get away with using so little data and still getting results due to the power of transfer learning and using already learned features.
Trending AI Articles:
1. Microsoft Azure Machine Learning x Udacity — Lesson 4 Notes
2. Fundamentals of AI, ML and Deep Learning for Product Managers
A primer on Image Augmentation
Image augmentation is a technique of preprocessing image data. It involves applying transformations (rotation, cropping, shearing, zooming etc.) on our existing images and adding these images to our database.
These transformed images are completely new to our model and help us in 2 two ways:
- Increases the size of our dataset
- Makes our model more robust and capable of handling ‘true-to-life’ images, which are not ‘perfect’
More on Image Augmentation here
Enough with theory, It’s Code Time!
Firstly, we import required libraries for image preprocessing
Next, we setup our Training and Validation DataGenerators and point them to our image directories
This line of code is used to define the transformations that the training DataGenerator will apply on all the images to augment the size of the dataset. The names are pretty self-explanatory, more information can be found in the docs
train_datagen = ImageDataGenerator(rescale = 1./255, rotation_range=40, width_shift_range=0.2, height_shift_range=0.2, shear_range=0.2, zoom_range=0.2, horizontal_flip=True, fill_mode=’nearest’)
For the validation DataGenerator, we only specify the scaling factor. The other transformations are not required because we are not training the model on this data.
valid_datagen = ImageDataGenerator(rescale = 1./255)
Next, we define the Model. I am using a VGG-16 as my base model, and add custom output layers to it for Binary Classification
We set layer.trainable=False for each layer of the VGG model, as we are using the pre-trained weights of the model.
Next, we flatten the outputs, add a custom Dense layer with ReLU activation and an Output layer with a Sigmoid activation.
Now we compile our model and train it on the dataset, that is augmented using ImageDataGenerators
After the model is done training, it is very important to save the model, so that it can be reused
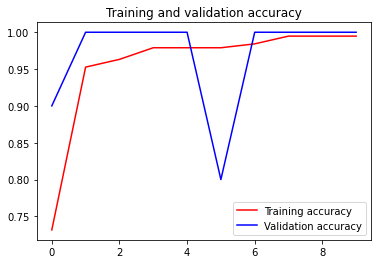
To view the performance of the Model graphically, we use Matplotlib
To feed a test image into the model, we need to preprocess it first
The result of the prediction is inferred as follows:
But how do we know the classes?
I spent a considerable time to understand what the numbers in the results mean, as it is not explicitly apparent.
ImageDataGenerator assigns numbers to classes based on the Alphabetic order of the class names. Since ‘memes’ comes before ‘people’ lexicographically, it is assigned the class number 0 and ‘people’ is assigned the class number 1.
Conclusion
This concludes our discussion for Part 1 of the series. The next article will focus on expanding the Model to cove more classes (Notes/Posters etc.), followed by minifying the model and serving it as a mobile application.
The Code for this article can be found at:
malhotra-paritosh/Whatsapp_Sorter_DL
Footnote
If you have read all this way, how about some claps???? and comments??
Au Revoir!
Don’t forget to give us your ? !


Using Keras ImageDataGenerator with Transfer Learning was originally published in Becoming Human: Artificial Intelligence Magazine on Medium, where people are continuing the conversation by highlighting and responding to this story.
