
Creating ML model for News Classification

This blog will be divided into four parts. Because I will try to explain the stuff from scratch so that if you have some basic knowledge about ML and python you do not need to wander here and there for deploying your first model on the WEB. Also, these four parts are going to be published at once so no need to worry about waiting for the next part.
Part 2 — Creating News Classification Django App ( Part 1) Link
Part 3 — Creating News Classification Django App ( Part 2) Link
Part 4 — Deploying on Heroku and live on Web Link
So are you ready?
So what are we going to deploy?
I am thinking about lots of stuff to share with you guys but as a start, I thought it’s better to deploy a News Classification model on Heroku. And this project is going to be made from scratch.
In this part of the series, I will tell you how to create a News classification model and save it for further use.

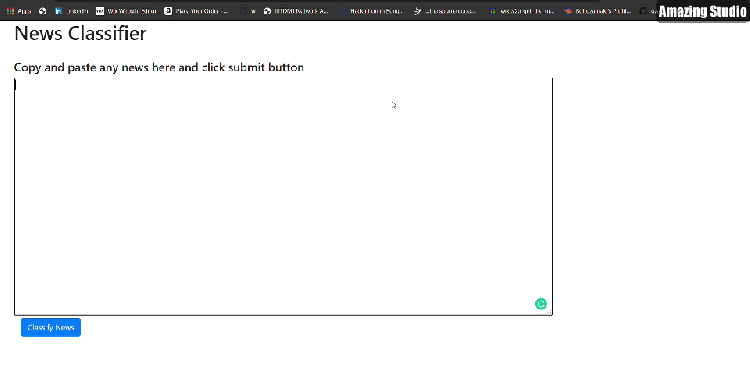
If you are wondering how our Web APP looks like. Below is the .GIF of a real working app and its link. (Wait for few seconds after clicking the link)
So without any further delay. Let’s get started. 🙂
Download the Dataset
First of all, we need a dataset to create a model. And for news classification, there is a famous dataset present on Kaggle named BBC News Classification dataset. First, go to this link and download the dataset.
Load and Visualize dataset
I am mainly focusing on making the model so I will not go deep into the Data exploration part. If you want to try Data exploration too then you can refer to Kaggle or you can visit my GitHub notebook link
First of all download and extract the dataset and open your Jupyter notebook.
Then load the dataset and let see how our dataset looks like.

As we can see that our dataset contains a text column and a category column, containing news and its corresponding category respectively. Moreover, we can see that there are 5 categories and all categories are nearly distributed equally ie. dataset is nearly balanced.
Dropping the Duplicate rows
Now let’s check whether there are any duplicate rows in the dataset or not. (If anyone is wondering how any dataset sometimes contains duplicate rows? Sometimes these kinds of datasets are created using scrapping from any website and during scraping sometimes two different paths can contain the same data, that is how the dataset often contains duplicate rows. So always keep in mind to check duplicate rows.)
So here we go 🙂
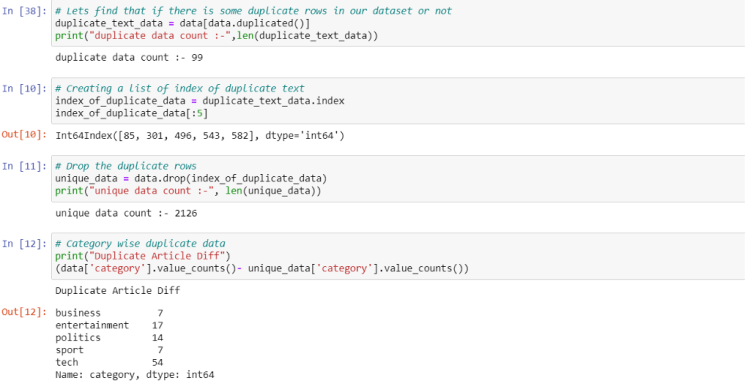
From the above code, we can see that this dataset also contains duplicate rows. We can first get the index of that duplicate data and after that, we can drop that rows from the real dataset using the drop() method. And also this dataset is already lowercased which is a necessary step in NLP problems. So we do not need to do it.
Vectorizing the Text
Now as we can see that the length of the dataset is around 2k which is not that much, so we should use ML algorithms because it works well with a small dataset.
But there is a problem that we can’t just feed text directly into the models we should convert this text and its categories into some kind of numbers which makes sense to our model.
Trending AI Articles:
1. How to automatically deskew (straighten) a text image using OpenCV
3. 5 Best Artificial Intelligence Online Courses for Beginners in 2020
4. A Non Mathematical guide to the mathematics behind Machine Learning
For this, we will use tf–idf. For those people who are hearing this term first time. This helps to convert sentences into a big matrix of numbers like BOW(bag of words). And a special thing about this technique is that it helps to take care of words which occur frequently that cause model to become more biased towards it. And also helps to give significance to rare words that occur in very few documents.


For this, we will use the TfidfVectorizer function which can be imported from the sklearn library. As we know that, in a sentence, there are certain words like “is”, “and” etc. which make sense to humans but not much sense for computers, and especially if you doing a text classification task these words are worthless. These kinds of words are called stopwords and can be removed while creating tf-idf by setting stop_words = ‘english’.
Also making tf-idf vector by using only one word is not useful because in English we have many compound words(like ice cream), that make different meanings if we write them individually. And to capture such a group of words we use the concept of n-grams (like bi-grams making group of two words and tri-gram making group of three words.). So setting ngram_range=(1,3) means creating tf-idf matrix of 1(uni-grams), 2(bi-grams) and 3(tri-grams). And by setting min_df = 5 means ignoring the words which occur in less than 5 Document(news here) which helps to remove noise.
Factorize the Categories
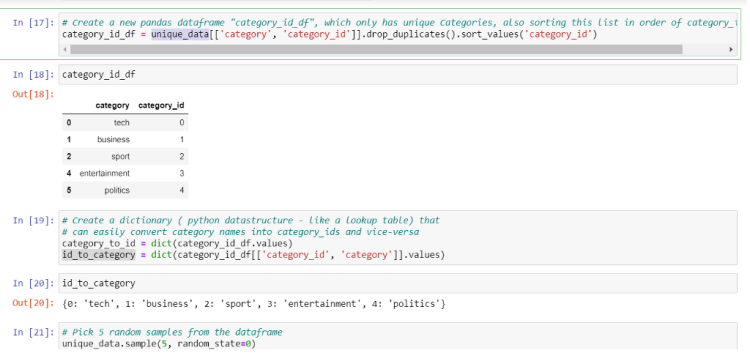
We have converted the text column to the matrix and now it’s time for the category column to converted into numbers, we can do this by factorize function. It assigns each unique category a unique integer value.
Also after prediction, we need to give output in form of text for that we are creating a dictionary that will map the factorized value back to its category text.
Decide the Model
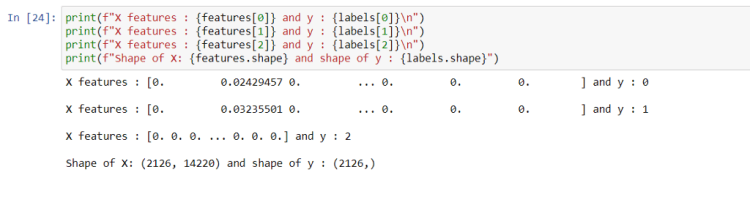
Now as we have everything ready to throw into ML models, it is time to initialize the model. But before that, we need to know what kind of problem is this is it regression or classification? So for that let’s take a look at our features and labels.
From the above figure, we can see that features are a matrix of size (2126, 14220) that means the number of sentences is 2126 and each sentence is transformed in tf-idf vector of size 14220 for each sentence, there is a corresponding value of labels which in reality is a category, and they are also encoded as a number. As we know that there are 5 categories and categories can’t be continuous value, we can frame this problem as a classification problem.
Initializing and fitting the Model
So we need to initialize the classification model for this. Let’s initialize 3 models at once so that we can choose the best of them according to accuracy.
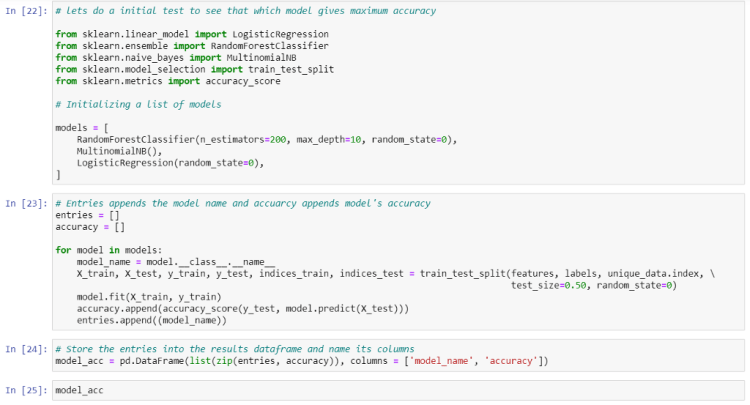
We will use RadomForest, Multinomial Naive Bayes, and Logistic Regression(actually logistic regression is a classification algorithm, don’t get confused by its name.)
Now we will iterate through these three models and observe the accuracy we achieved

We can see that Logistic Regression is doing well here and it achieved 97.27% accuracy. We can increase the accuracy of these models further by changing some parameters. But let leave this for now because we already achieved more than 95% accuracy.
Creating Logistic Regression Classifier
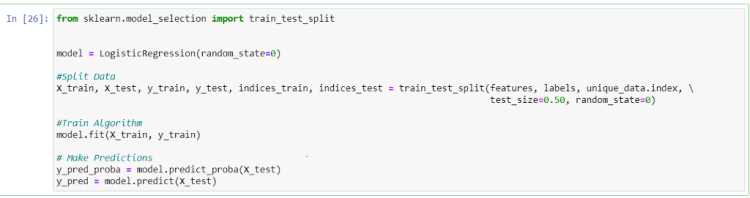
Now create the Logistic Regression model separately and let’s plot a confusion matrix plot too.
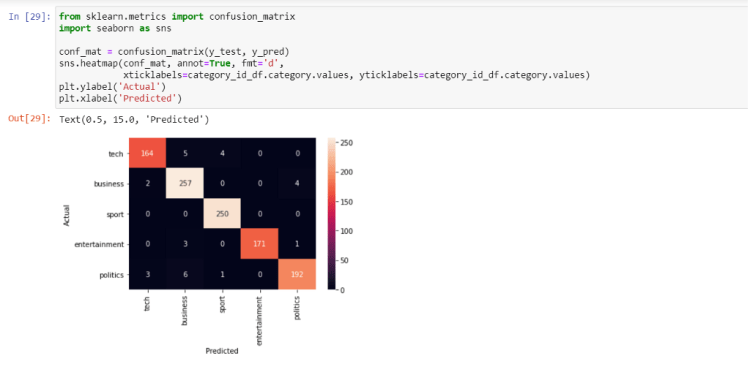
Quite a good performance isn’t it? Remember this, always try to go for the ML model first when you have a small dataset. If you try Deep learning on this dataset you will not reach this much accuracy in just a few steps.
Saving our Model
Now nearly everything is set. We just have to save our model

At last, we need to save our model, tf-idf transformer, and out id_to_category dictionary so that we can use this directly for our prediction in Web APP.
I know you may have got tired, so take a break for a few minutes and get ready to move into the next part ie.
Creating News Classification Django App (PART 1)
And wait wait wait ! before moving on further if you like this article then you can give me a clap 🙂 and I am thinking to create many articles on real Web deployment projects in the field of ML, CV, and Reinforcement learning. So if you do not want to miss them. Follow me and stay tuned 🙂
Readers are most welcome to notify me if something is mistyped or written wrong.
My contacts.
Don’t forget to give us your ? !


Deploy your first ML model live on WEB (Part 1) was originally published in Becoming Human: Artificial Intelligence Magazine on Medium, where people are continuing the conversation by highlighting and responding to this story.
