
Behind the talk of making AI ethical, lies the task of making ethical AI by directly working with & listening to the communities it…
Continue reading on Becoming Human: Artificial Intelligence Magazine »

365 Data Science is an online educational career website that offers the incredible opportunity to find your way into the data science world no matter your previous knowledge and experience.
Behind the talk of making AI ethical, lies the task of making ethical AI by directly working with & listening to the communities it…
Continue reading on Becoming Human: Artificial Intelligence Magazine »

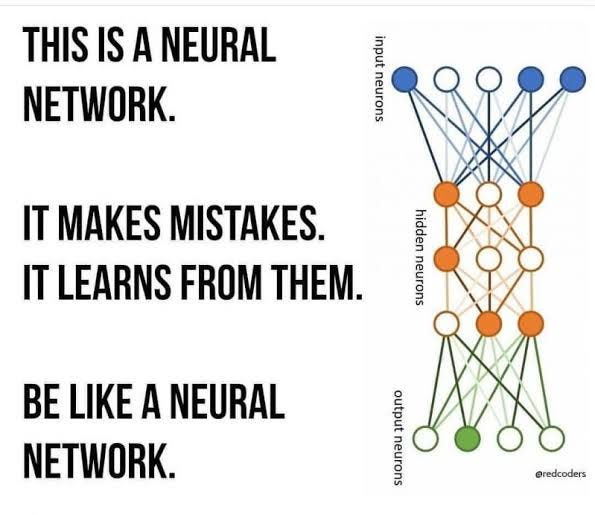
Neural Networks are inspired by biological neuron of Brain
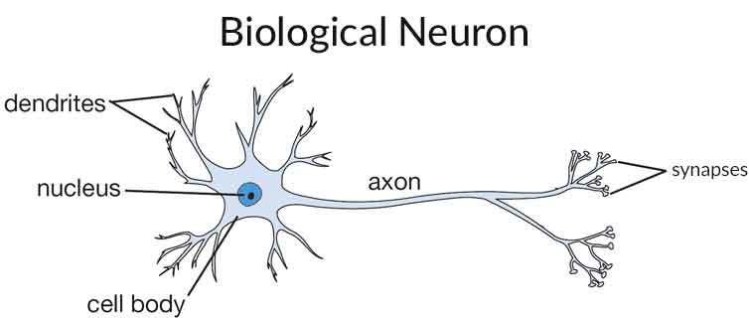
from the dendrites inputs are being transferred to cell body , then the cell body will process it then passes that using axon , this is what Biological Neuron Is .

Same process like Brain Neuron
How Neural Network Works ?

Steps :

What is Activation Function ?
IF we did not use the activation function means it is equal to the Linear Regression Model ,
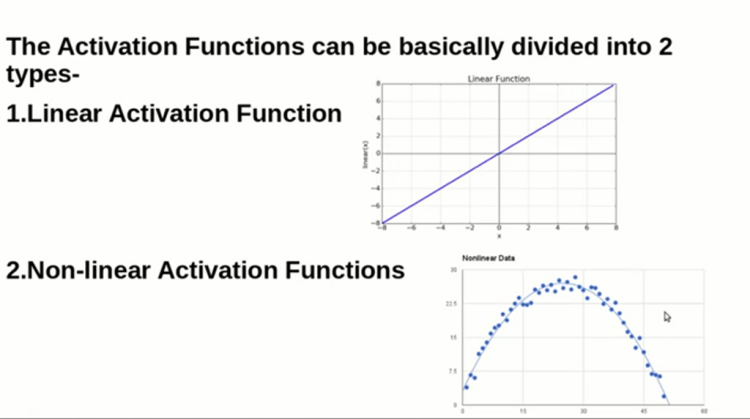
Non-Linear activation Function are more overly used because in real world data-set we will handle non linear data-sets a lot so that linear is not much usefull
Activation function are used in the hidden layer and output layer
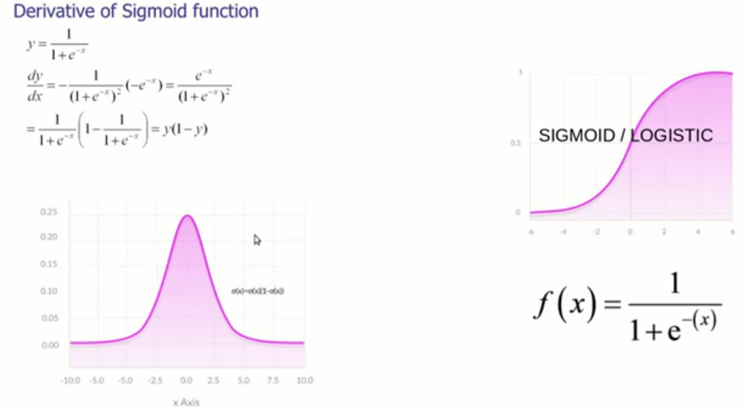
there are many Non-linear Activation functions are available like Sigmoid , tanh , ReLU etc….
want to know more about activation function
Each Activation functions are having their own derivatives
In this Sigmoid Derivatives has been shown , Derivatives are used for updating the Weights
1. Only Numpy: Implementing Convolutional Neural Network using Numpy
3. Understanding and building Generative Adversarial Networks(GANs)- Deep Learning with PyTorch
if your problem Regression means in the hidden layer and output layer you should not use Sigmoid you can use ReLU , Classification means Sigmoid we can use

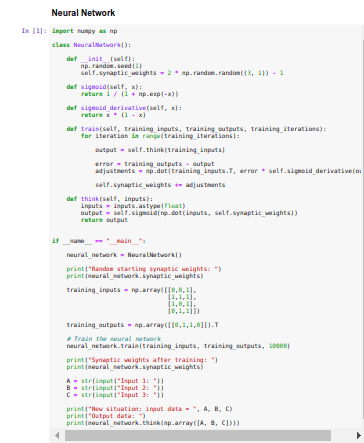
We are having the inputs in which 0 and 1 , outputs are 0 and 1 , so for these we can use sigmoid
if you have new situation like for 1 0 0 what will be the output ?

Forward Propagation
Takes the input and multiplying weights with it , adding bias to it , pass it into sigmoid function y is calculated , then doing subtraction with original y to calculated y
error =original_y — calcul_y
calculated y is passed to the sigmoid derivatives stored as sd , then multiplying error and sd , and then doing the matrix multiplication and storing the value as Adju .
Backward Propagation
Then adding Adju values to the weight , the weight has been updated , weight+=adju
repeat it until the error gets low
Code : git-hub

Randomly started weights and finally error corrected weights , then we have given iput as 1 0 0
output for it 0.9993704 nearly 1 almost right , this is how the neural networks are Working


Neural Networks From Scratch Using Python was originally published in Becoming Human: Artificial Intelligence Magazine on Medium, where people are continuing the conversation by highlighting and responding to this story.
Originally from KDnuggets https://ift.tt/2yHZl17

Hello, fellow scrapers! In this tutorial, we will talk about request headers – what they are, in what way they may restrict our scraping and how to use them to our advantage. We will also discuss a special type of a request header – cookies.
Well, when you’re sending a request to a server you’re not just saying: ‘Hey, give me that info, please’. You are also providing information about the request itself – information, such as the encoding and language of the expected response, the length and type of data provided, who is making the request and so on. These pieces of information, referred to as headers, are intended to make communications on the web easier and more reliable, as the server has a better idea of how to respond.
Well, every type of header information is contained in a standardized header field. Two of the most common header fields are the ‘User-Agent’ and ‘cookie’. Let’s take a deeper look into those.
When a software sends a request, it often identifies itself, its application type, operating system, software vendor, or software version, by submitting a characteristic identification string. This string is referred to as a “user agent string”. You can think of it as an ID card containing some basic information.
All browsers, as well as some popular crawlers and bots, such as ‘google bot’, have a unique ‘user agent string’ that they identify themselves with.
Well, a lot of companies set up their servers in a way that allows them to identify the browser a client is using. In fact, most websites may look a tiny bit different in Chrome, Firefox, Safari and so on. Based on the browser, a specific version of the web page is sent to the client for optimal visual and computational performance. However, this may become an issue for us if we do not provide a proper ‘user agent string’.
In this situation, the HTML we are looking at in our browser may be different from what we receive as a response. The solution in this case, though, is pretty straightforward – exporting the HTML response to a local file and inspecting that one, instead of the browser version.
In that case, to continue scraping, we need to provide a legitimate user agent. Fortunately, all browsers’ user agent strings are available publicly on the internet. Thus, we can easily pretend to be a browser.
Let’s see how to do this in Python using the ‘requests’ package.
Incorporating different headers using ‘requests’ is actually a very simple job. All we have to do is supply them in a dictionary format to the ‘headers’ parameter.
For instance, suppose we want to make a GET request to YouTube, pretending to be a client using Chrome. First, we need to find the User-Agent string of Chrome. A quick Google search yielded us this string:
“Mozilla/5.0 (Windows NT 10.0; Win64; x64) AppleWebKit/537.36 (KHTML, like Gecko) Chrome/74.0.3729.169 Safari/537.36”
Okay. We can save it in a dictionary with field name ‘User-Agent’.
Now, we can make a GET request using the usual ‘get()’ method of the package. The URL of the site we want to connect to is passed as a parameter. Normally, that would be all.
![]()
However, in order to incorporate the request headers, we can add them in dictionary form to the additional ‘headers’ parameter. In our case, we have saved the dictionary in the ‘header’ variable, so we pass that to the parameter.

That’s it. This request now contains a ‘User-Agent’ header field.
And here’s the full code:

By adding different fields to our dictionary, we can incorporate different headers into the request.
If dealing with request headers is that simple, what is so special about the cookies?
Well, an HTTP cookie is a special type of request header that represents a small piece of data sent from a website and stored on the user’s computer. It is different from other headers, as we are not the ones to choose it – it is the website that tells us how to set this field. Then, the cookie can be sent along with subsequent client requests.
They can also be used to remember arbitrary pieces of information that the user previously entered into form fields, such as names, addresses, passwords, and credit-card numbers.
Perhaps the most important one is the authentication cookie. It is the most common method used by web servers to know whether the user is logged in or not, and which account they are logged in with. This basically means that you are not required to sign in every time you open or reload a page.
Cookies are implemented a bit different from the ‘user agent’, as websites usually tell us how to set them the first time we visit a page.
We can open a new session using this command.
![]()
Notice that we assign the session to a variable. Later, we can make requests through this variable. Every such request within that session will incorporate persistent cookies automatically. We don’t have to do anything. After we are done, we have to close the session.
Here is an example code:

Just remember that the request should be made through the session variable. You can find more about that in the official ‘requests’ documentation here.
You have now added the request headers weapon to your web scraping arsenal. Let us know how you implemented it in your practice in the comments below!
Eager to become a Web Scraping Pro? Check out the 365 Web Scraping and API Fundamentals in Python Course!
The course is part of the 365 Data Science Program. You can explore the curriculum or sign up 12 hours of beginner to advanced video content for free by clicking on the button below.
The post What Are Request Headers And How to Deal with Them When Scraping appeared first on 365 Data Science.
from 365 Data Science https://ift.tt/3aZtIhO
Originally from KDnuggets https://ift.tt/2UWv3QQ
Originally from KDnuggets https://ift.tt/2XnG13y
Originally from KDnuggets https://ift.tt/3e0yOMV
Originally from KDnuggets https://ift.tt/3aVzFfL
The American philosopher John Searle often makes the point that many believers in Artificial Intelligence (AI), computational cognitive…
Continue reading on Becoming Human: Artificial Intelligence Magazine »

There is no single day in the life of a software engineer when it comes to tackling complex and large problems in a fast-paced tech environment. Before delving into details of solving problems of complex nature, let’s have a look at the process of problem-solving in general.
At a high level, there are six phases to tackle a large scale problem:

We will go over the each of the six phases in detail and talk about:
Rendering reliability will be used as a working example to give more color and depth to each phase for software engineers.

Software engineers are not short of opportunities for problem-solving at the companies. The first step is to eliminate the noise and identify the fundamental problem(s) that is most impactful to the business. In this step, you validate the list of opportunities with additional supporting data points, that include SEVs, SLA tasks, logging data.
There is no set time duration for this phase; looking out for large class of issues (rather than fixing constant small bugs) should be part of our day-to-day operation.
Let’s take the following example of identifying rendering reliability opportunity
Product teams have usually been relying on manual QA tests to prevent incorrect rendering online ads. However, a large number of rendering variations based on device, platform, and ad product types can make it hard to ensure reliability. Even small corner cases can have a significant revenue impact, and these cases are usually introduced by ad or non-ad teams since rendering is built on top of a large shared codebase. Since these could impact advertiser trust, revenue loss and engineering productivity, rendering reliability stands out to be a top problem for a tech company.

Expected outcome before moving to next phase will be to find one or few investments that can give high impact for the business. Moving to next phase without addressing this may yield into many parallel analysis, which will be very time consuming. Based on the example above, rendering reliability is one of the key investment that could have high business impact (improve advertiser trust, reduction of refund, avoid bad PR that may tarnish company’s reputation).

It is often tempting to avoid time for further investigation as everyone wants to deliver a solution and show impact as soon as possible. Before diving into a solution, there should be an identification of a few critical subsets of problems that make up the bigger problem. Not investing time on this phase may lead to solutions that aren’t highly impactful.
Time boxing this phase would help avoid delving too much into the tail-end issues. This phase usually takes 1–2 months. Typically we set “understand” goals and aim for developing conviction for the problem space and the impact we can generate by eliminating it.
No one would prefer to jump-in and start fixing problems by picking one Product or one Surface or fixing problems for one format at a time. Rather, time should be spent in analyzing classes of problems, impacts, recurrence using data.
Given the case of rendering reliability, below are some examples of major issues which are commonly encountered in tech companies:
Expected outcome before moving to next phase should be to dissect the opportunity further into classes of problems. From the above example, it was clear that focusing on image cropping, wrong image and missing component will yield higher success.

Instead of doing a tactical solution of fixing each problem on isolation, you can invest a few weeks in delving into strategies in solving the classes of problems. This includes analyzing possible ways to solve the problem, investigating the tradeoffs of different approaches, brainstorming with broader team and coming with a unified approach. It is equally important to identify key metrics that will measure the impact, although it is difficult to bet on goals during this phase. At this phase we slow down a bit in order to run faster.
Let’s take a deep dive into rendering pipeline, understand the complexities, touch points, code complexity, and potential stages the problems can be detected and prevented. We can broadly group the opportunities in three major stages as below:

Expected outcome before moving to next phase should be having a clear strategy on how to develop a solution is an important outcome before we come-up with a solution. In the above example, we can create a three phase strategy to improve rendering reliability. We then can create three smaller teams to start working towards a solution.

Once the team start producing impact, the team can incrementally add additional layers of reliability, scalability, and monitoring.
Having concrete goals that define the failure and success states is critical. The solution will most likely won’t cover the whole problem domain yet, however, parts of the problem domain covered should yield results that will help you build confidence in your solution.
The main goal is to create a solution that can help us succeed fast of fail fast. Although, scalability is one of the considerations, it isn’t the primary goal for many tech companies:
Expected outcome before moving to next phase should be to demonstrate simple, working solution that help address the problem. The solution at this phase is neither highly mature, nor scalable. However, it is important to have basic building blocks to make it a working solution. This includes monitoring and test automation. In the above example, we can create three simple solutions just to prove that we are able to detect and prevent rendering problems.

Creating the right communication channels and cadence with customers, leadership and partners will help increase the visibility of the work and allow critical feedback to flow in. It is vital to have key metrics to measure the impact and make them a prominent part of the communication. The following are some examples of such improvement points:
Expected outcome before moving to next phase should be a clear set of metrics to measure the impact, regular consistent communication with partners and leadership. In the rendering reliability example above, there can be some types of bi-weekly and monthly communication channels among partners and leaders.

As the solution gets to a mature state, ongoing investment can be reduced, however, adequate monitoring should be in place to look out for potential regressions. In many tech companies, systems usually evolve quickly, which may require adjusting or re-thinking the solution.
In the rendering reliability example, we can figure out the end goal, prioritize them to get to the completion and reach out to other partners to leverage the solution.
The sample chart below displays how the number of discovered issues can increase at the early stages while adding more detection. Once a solution that can help prevent issues is in place, the number starts decreasing. Increasing the coverage of the solution will usually push the number further down to a state where the problem is not “big” anymore.

Thank you for reading so far! One take-away from this article should be that given these tips and tricks, engineers should really no longer worry about tackling complex problems. So, let’s nail down your next challenge!
The Art of Tackling Large Problems was originally published in Becoming Human: Artificial Intelligence Magazine on Medium, where people are continuing the conversation by highlighting and responding to this story.
Via https://becominghuman.ai/the-art-of-tackling-large-problems-fe559bc90c3e?source=rss—-5e5bef33608a—4
source https://365datascience.weebly.com/the-best-data-science-blog-2020/the-art-of-tackling-large-problems

