365 Data Science is an online educational career website that offers the incredible opportunity to find your way into the data science world no matter your previous knowledge and experience.
There are plenty of articles available on Training your own custom object detection model using TensorFlow, YoloV3, Keras, etc. But most of us doesn’t know how to do it or want to spend a lot of time on just reading and understanding the algorithms and then creating our own dataset and then training that dataset which requires resources and time and a lot of research, So if you are one of us this article is for you
It’s very difficult to manually download each and every image from the internet. NO worries today I’m here to make your life easier
Artificial Intelligence Jobs
.
Here is a Chrome extension to download images in bulk in one go Imageye. Just add it to your browser, search for the object you are looking for. Click on the extension and BOOM!! there you go all the images will be downloaded.
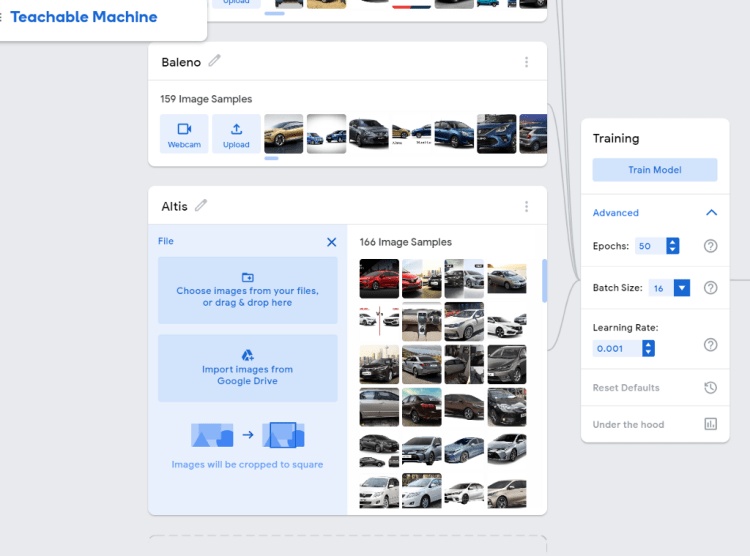
Step 2: Uploading the dataset for training
Open this link. just like show in the picture you have to create a class give the class a label, click on upload>choose images from your files>select the images that you have previously downloaded, repeat this step for all the objects that you want to detect.
Now you are ready to train your model by just clicking on the Train Model button.
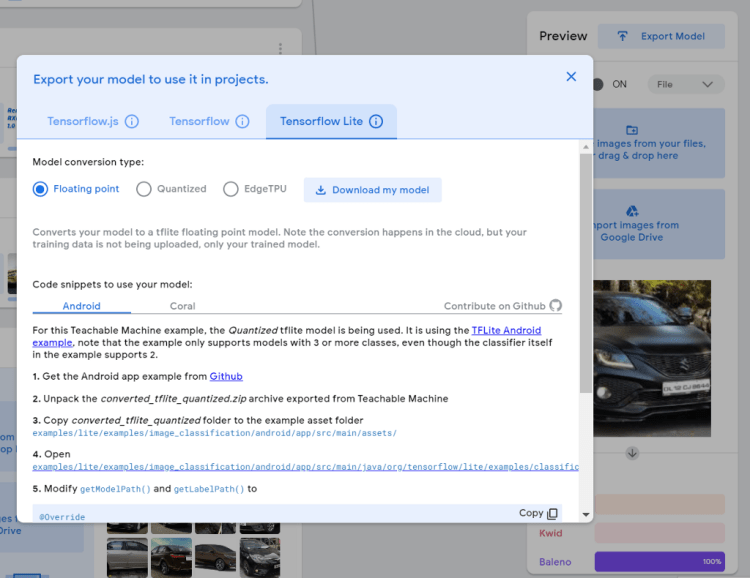
Step 3: Exporting the trained model
After the model is trained you can test it by uploading an image and the result will be displayed below.
If everything is working well, now you can export the model. Click on the Export Model button and this popup will open, now select the TensoflowLite tab and click on Download my model. It will download a zip file for you.
Step 4: Creating the flutter project
Clone this repository and install the dependencies by running the command in the terminal
Flutter pub get
Step 5: Replacing the custom trained model with your model
In the assets/tflite folder, you will find two files i.e. ssd_mobilenet.tflite and ssd_mobilenet.txt. Extract the zip file that you downloaded above and replace these files in the assets folder and make sure to rename them.
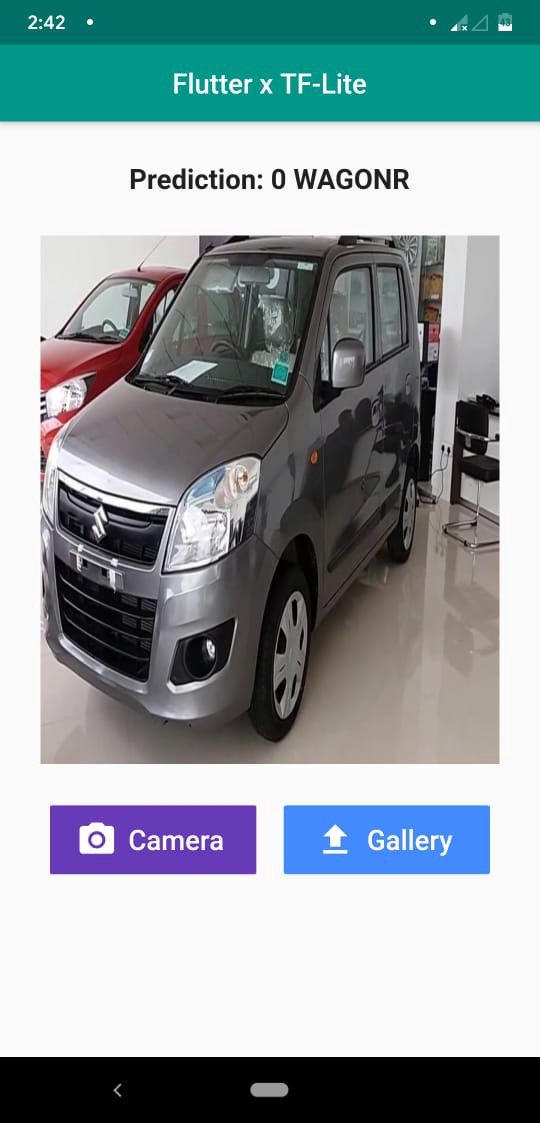
Step 6: Run the app and test it
Now simply you just have to run the app and the interface looks like this, obviously, this is a demo UI you can make your own tweaks and changes to make it shine.
There You Goo, CONGRATULATIONS ?? on your own custom object detector
If you have made it through this article very well make sure to clap? and start the repository if you like it, have a good day.
A popular topic in the deep learning research space is interpretable AI. Which means AI that you can understand why it made a decision. This is a growing field as AI is creeping into lots of industries. And accuracy is not just important but the method or reasoning of the decision is important as well. This is important were the consequences of the decision is very critical like medical and law. In a Wired article, they highlighted this when the AI was flagging patients to check up. Which the doctors have no clue why the AI did that. So some doctors took it upon themselves to learn some stuff about the AI. To guess what it was thinking when it decided. Not having reasoning for the AI lead to some disagreements between the nurses and doctors. So having an explainable AI would help in that scenario.
Interpretable AI can help discover bias in the AI. When AI was used in the criminal law realm. Lots of AI tended to make harsher judgements of black people compared to white people. Having an explainable AI would have made it much clearer that the AI was being driven by the race of a person. Explainable AI can give us peace of mind if done correctly. As it can list the variables that affected the sentence of the person. Instead of a black box-like now where it just spits out a number. It could tell why it spat out the number.
Artificial Intelligence Jobs
I’m going, to be frank. I only have a surface-level understanding of the topic. I only read one or two light papers. So more reading will be needed. And also implementation. But I think interpretable AI can be very useful for many AI systems like I explained above.
One video I watched. Said her and her team used interpretable models to debug models. And was able to increase the accuracy of the model significantly. So we can be able to do stuff like that. Debugging deep learning models is hard. Due to the black-box nature of them. An interpretable model can help us shine the light on these models. Helping us improve our models even more. In an unreleased post, I wrote about interpretable AI can help make recommendation systems used by the major tech companies more transparent. Also leading to more understanding by users and other stakeholders like the regulators. This can help people identify harmful rabbit holes like conspiracy videos and anti-vax content.
By having a better understanding of why a tech service is recommending you stuff. The user can take action towards changing the situation or keeping it like it is. Maybe using that information the tech company can add features to stop a user from falling too deep in an echo chamber. Like adjusting the suggested videos to more moderate content. Or videos that have different views than the echo chamber that the user is in. Or maybe have nudges saying, “you been watching the same type of videos for a while, try something else.”
Also, it can help identify videos that are going viral in certain areas. Especially if the area is problematic. So, if you can see a video in conspiracy theory land. Gaining traction, you can see how and why the algorithm is recommending the video. From there the tech company can make the decision to do a circuit breaker with the video. Or let it run its course.¹ This may be better than trying to outright ban topics on your service. Due to the whack a mole effect.
Obviously, almost all of this is automated. So the insights are taken from the interpretable AI. Will need to be transferred into another system. And be factored into the model. I don’t know how would one implement that though.
An explainable AI can help moderation teams for tech companies. As an AI can help tell the moderators why it decided to ban a piece of content. And if its an appeal then the moderator can explain to the user why he was accidentally banned. And explain to the user how to avoid it from happening again. Also, the moderator can help tell the AI that it was wrong. So the AI can get better at its job next time around.
When YouTube videos get removed from the platform. YouTube does not tend to offer a good explanation of why it was so. It normally gives some PR / Legal email saying you violated terms and conditions. But the creators do not know which terms and conditions were violated. Some YouTube creators may resort to complaining on Twitter to get a response from the company. While I think YouTube is partly vague because of some legal situation. I think having a transparent AI can help. YouTube can show creators why the situation is like this. YouTube may not know what happened due to the black-box nature of the algorithm.
Interpretable AI will not solve all of technologies problems. A lot of problems frankly is a lack of government regulation and oversight. As in many areas of technology, there are no ground rules. So the technology companies are going in blind. And people are upset about whatever the tech companies do. If the legal situation changed were YouTube can tell its creators why it violated its terms and service. That will be great. Instead of having a cat and mouse game. If government officials even knew what it was talking about when it came to technology. Right now I think the European Union has the best understanding. While I think some of its initiatives are flawed. In the USA the government is only now waking up to the fact they need to rein in big tech. But I’m not confident that the government has a good understanding of the technology there dealing with. You can see some of the viral videos of the original Mark Zuckerberg hearings. Where the congressmen were asking questions that lacked a basic understanding of what the internet and Facebook even is. Never mind how should the government deal with data. Or incentivise companies to have transparent AI.
[1] Tech companies already do this to fight this misinformation. But an Interpretable AI can make this process easier.
An intuitive and replicable explanation to some of the most important questions of portfolio building
At first glance investing seems like rocket science to many people. The sheer amount of possible assets to invest in and the amount of fancy sounding finance terms might seem intimidating. This blog-post elaborates on three of the most asked questions when building a portfolio. This is done by starting with a theoretical explanation and, more importantly, an empirical validation using Python.
We start by loading all the relevant packages and putting the directories for our project in place.
# Packages
import pandas as pd
import numpy as np
import os
import matplotlib.pyplot as plt
from tqdm import tqdm
In order to make the financial theory come alive, we need to create financial return time-series data. In order to work with real financial returns, we use the yahoo finance API. This is done by using the pandas webreader. This powerful package can, among others, download historical price data for different stock tickers. A stock ticker is the abbreviation of a company name used at the stock exchange. For example, the ticker-name of Apple is AAPL. An extensive list of companies and their stock tickers can be found here.
After downloading the aforementioned excel, we upload them into Python with the following lines.
Now it is time to build a function with which we can create financial returns for a certain number of assets. As the input parameters we select the number of return time-series we would like and for how many years back from today we would like them. The following function allows us exactly that.
def financial_dataframe_creation(ticker_list,
                                 number_of_stocks,
                                 starting_year):
    """
    This function imports finanial price data from yahoo from a
    pre-defined list of stock-tickers.
Parameters
    ----------
    ticker_list : list
        list with stock-tickers used by yahoo finance
    number_of_stocks : int
        number of stocks desired in the final dataframe
    starting_year : TYPE
        year from which we would like to extract financial data from
Returns
    -------
    returns : dataframe
        this dataframe contains daily returns for as many
        stocks as were specified in the beginning
We can see that the different assets are now displayed as columns names and we find one annualized return information for every day of our time series. With the knowledge that our function works, we can start to answer the questions.
“The more stocks in the portfolio the lower the overall risk”
Theory
This statement might seem counter-intuitive at first glance. Having more stocks in your portfolio might seem that there are more things that could go wrong. The reason that this is not the case is related to a concept called diversification.
Imagine that you only have one stock in your portfolio. In that scenario your portfolio is predominately exposed to two kind of risks: Market risks and firm-specific risks.
The firm-specific risks are specific to one individual firm. These risks range from a sudden death of the CEO (assumed to be negative news) up to unexpectedly finding oil on the company’s grounds (assumed to be positive news). Note that if an investor is only carrying one stock in their portfolio, they are heavily exposed to these company-specific risks.
Market risks compromises risk that affect macroeconomic factors like interest rate changes, inflation, unemployment, and so on. If for example the global economy enters a recession and overall fewer goods are sold and bought, the one individual firm in the investor’s portfolio is also going to be affected by it.
When now investing not in one, but in multiple stocks, the company specific risk reduces quite massively given its small contribution to the overall portfolio performance. The market risks on the other hand, given its wide-reaching and all-affecting implications, has an impact on the total portfolio performance nevertheless. Since market risks affect all stocks, they are also referred to as systematic risk. This kind of risk does not reduces when we increase the number of stocks within our portfolio.
Empirical Evidence
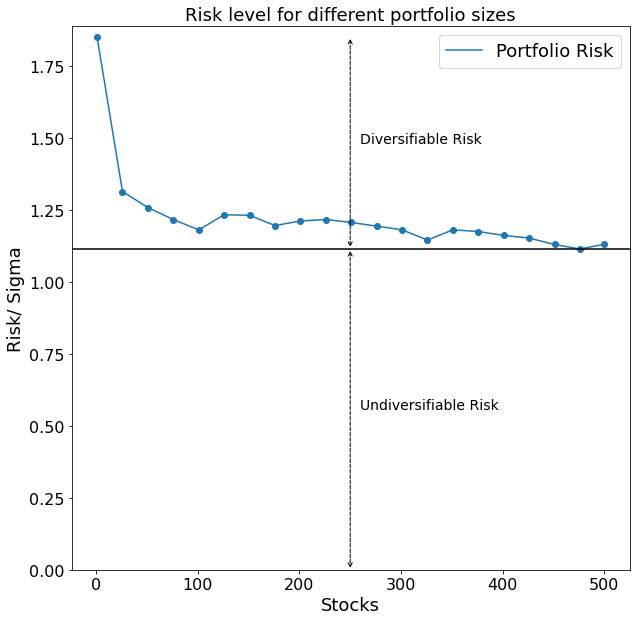
In order to validate the financial theory outlined above we create multiple portfolios with an increasing amount of stocks in each portfolio and re-calculate the risk of each.
We start by initializing time series data for 500 stocks, starting in the beginning of 2016 up until today. This is done using the following code
Now we would like to show how the overall portfolio risk reduces when we include more assets in our portfolio. For that we calculate and store the portfolio risk of a given portfolio of the first 25 assets. Afterwards we add further 25 assets to that portfolio and re-calculate the risk again and so on. This is done through the following code:
When plotting the results we get the following picture:
Our hypothesized reduction in overall portfolio risk with an increasing amount of stocks shows up nicely. The black horizontal line drawn in the graph furthermore depicts the level of risk of a portfolio which cannot be further reduced even when including more stocks into the portfolio. That is because all stocks are going to be affected by the volatility of the market as a whole. This minimum threshold of risk is also called undiversifiable risk, whereas we call the risk which is possible to reduce the diversifiable risk.
“The important risk kind of an asset is its covariance with other assets and not its own volatility”
Theory
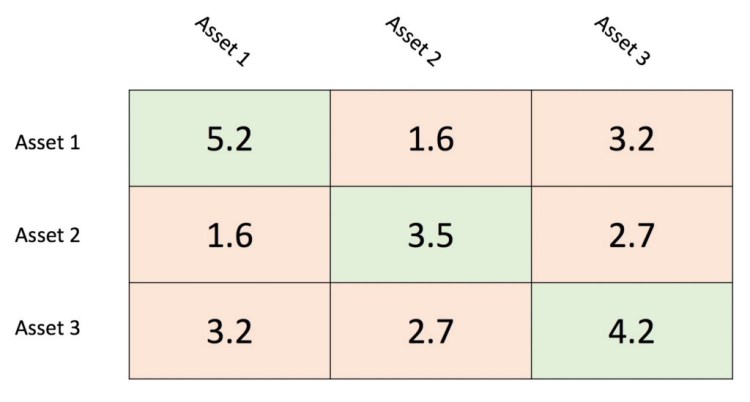
The answer to the question of how to calculate the risk of an equity portfolio is easier than one might initially think. It is actually only the sum of the portfolio covariance matrix. The covariance matrix shows each asset’s variance on the diagonal and the covariance with each other asset in the upper and lower diagonal matrix. As an example let us consider the covariance matrix below. The variance are denoted by a light-green shaded background whereas the covariance have a light-red shaded background. It is important to note that the upper diagonal matrix and lower diagonal matrix are identical. That is because the covariance of A and B is equal to the covariance of B and A.
It is important to know how the number of variances and covariance scale with the size of the portfolio. A portfolio with n-assets for example has exactly n variances and n²-n covariances. It is easy to see that with a higher number of n the covariances outnumber the variances significantly.
Empirical Evidence
To check whether that is also empirically the case, we implement the following code.
The plot above shows us exactly the hypothesized outcome. The over sum of covariances represents a multifold of the sum of variances of the portfolio. This finding entails interesting implications for the selection process of an asset. The asset’s own variance carries little to no importance for the risk of a well-diversified portfolio.
“A longer investment horizon reduces the portfolio risk”
Theory
The investment horizon describes how an investor plans to hold the portfolio. These ranges can span from merely a few days up to multiple years. When deciding for a longer investment horizon an investor typically allocates most of their assets to a higher risk area, like equities. This is because the larger price swings, equities exhibit in the short term, have no impact on the long-term goals of the investor.
Empirical Evidence
The following code shows how we can empirically test this theory.
number_of_stocks = 100
weighting = 1/(number_of_stocks ** 2)
years = np.arange(2000, 2020, 2)
risk_list = []
for year in tqdm(years):
    time_returns = financial_dataframe_creation(ticker_list,
                                                number_of_stocks,
                                                year)
    portfolio_var = weighting * time_returns.cov().sum().sum()
    portfolio_std = np.sqrt(portfolio_var)
    risk_list.append(portfolio_std)
The code above first takes 100 arbitrary stocks using our function which we declared in the beginning of this post. Afterwards the portfolio variance for an equally weighted portfolio is calculated for different time-spans. The result is the following plot.
Interestingly, even though we can see an overall trend to a smaller risk level over time, the relationship is not perfectly negative. This is because we find a local minimum after around eight years. This finding is likely to be explained by the financial crisis 2008. Given that we started to track our portfolio performance in the year 2000, after eight years we find our portfolio in one of the most financially unstable times in modern history. After a couple of turbulent years, we find the portfolio risk to decrease again, which is quite an affirmative sign in the direction of our hypothesis that a longer time horizon reduces our portfolio risk.
Having a machine learning model that generates interesting predictions is one thing. Understanding why it makes these predictions is another. For a tensorflow predictive model, it can be straightforward and convenient develop an explainable AI by leveraging the dalex Python package.
We recently surveyed KDnuggets readers to determine the “most wanted” data science skills. Since they seem to be those most in demand from practitioners, here is a collection of resources for getting started with this learning.
Learn how the use of more granular symptoms-level data combined with innovative statistical techniques has the potential to identify disease outbreaks faster while limiting false positives.
You can follow these steps to make a Linux system ready for AI from scratch.
You need CUDA to use NVIDIA GPUs for general purpose processing. As NVIDIA puts it: “CUDA is a parallel computing platform and programming model that makes using a GPU for general purpose computing simple and elegant.” More information can be found under this link.
CUDA
Let’s check to see if CUDA is installed or not and if yes, which version. We can do that by:
nvcc --version
If nvcc is not available, you can install it by the following command:
sudo apt install nvidia-cuda-toolkit
If CUDA is not installed or you want an updated version installed, you can follow the steps on the NVIDIA website to install it.
Big Data Jobs
For example, here are the instructions for installing CUDA Toolkit version 11.0. We are assuming Ubuntu 18.04 with x86_64 architecture. The installation method is runfile (local). You can find further instructions and options under this link.
If you like to install CUDA 10.1, the instructions can be found here. I have found the runfile (local) method of installation to be prone to less errors.
The last step is to make sure that the path to CUDA is correct. Let’s quickly check the CUDA version again by running the following command:
nvcc --version
If the version is what you expected, we are good to go. Otherwise, let’s fix the path. You can find the list of installed CUDA versions under /usr/local/ folder by running the following command:
What we are doing here is that we remove the current cuda folder and we symlink the newly installed cuda-11.0 in its place. We then add the path to the .bashrc file (assuming using bash).
Anaconda
To have independent environments for different projects, we can use Anaconda. It is especially useful when you are working on multiple projects with different dependencies and you want to switch between them quickly.
If you do not have pip installed, you can install it via:
sudo apt install python-pip
To install Anaconda, you can follow the steps under this link. For example, to install the 2020.07 distribution for x86_64 architecture, you can run the following commands:
You can choose different distributions of Anaconda from this repository.
Dependencies
This is the last step to create a conda environment and install the dependencies.
Let’s open a new terminal and create and activate a new conda environment, named ai, with the following commands:
conda create --name ai python=3.7 --yes
conda activate ai
Please note that you can edit the choice of name and Python version for the environment.
PyTorch can be installed by following the instructions under the official website. For example, you can install the latest version of PyTorch with assumption of CUDA 11.0 using the following command:
If anyone landed on this page directly then wait you will have to read the first, second and third part of this series to get the idea of what’s going on here 🙂
Part 1 — CreatingMLmodel for News ClassificationLink
Part 2 — Creating News Classification Django App ( Part 1) Link
Part 3 — Creating News Classification Django App ( Part 2) Link
This is going to be a small part so Let’s get started.
Open the settings.py in “newsclassifer” folder and change Debug=True to Debug=False. Because you are putting your website on Web so we do not need to run our website in debugging mode.
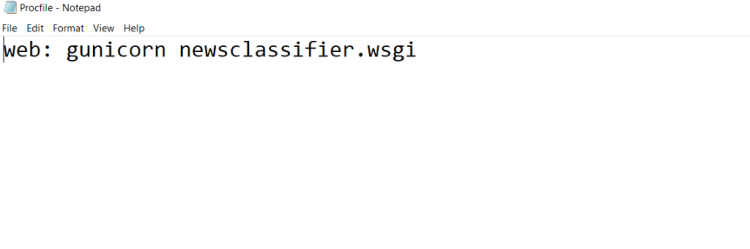
Step-5
Now open a new conda terminal and install gunicorn and django-heroku using pip.
And now search for your django, gunicorn, sklearn and django_heroku version in the lists of libraries, in my case requirements.txt looks like.
Step-9
Now open the GIT bash terminal in “newsclassifier” directory in which manage.py is present, by clicking right key of your mouse.
After opening GIT bash type below code step by step.
git config — global user.name “FIRST_NAME LAST_NAME”
git config — global user.email
git init
git add .
git commit -m “first”
heroku login -i
Now type your email and password of Heroku cloud. And you will log in into your Heroku account in bash.
Now type
heroku create newsclassif
Note “newsclassif” if the name of the application and it should be unique ie. you can’t type the above name because it is already taken by me so try some other name.
At last type
git push heroku master
And it will do the automatic setup of your website on Heroku cloud. After few seconds you will get a link like this
This means that your website is online on WWW on Heroku cloud. Now you can open this site from anywhere in this world 🙂
Thanks for everyone who followed this series of articles so far. And if anyone got any problem, then you can ask me in comments. I will reply for sure 🙂
And wait wait wait ! before moving on further if you like this article then you can give me a clap 🙂 and I am thinking to create many articles on real Web deployment projects in the field of ML, CV, and Reinforcement learning. So if you do not want to miss them. Follow me and stay tuned 🙂