365 Data Science is an online educational career website that offers the incredible opportunity to find your way into the data science world no matter your previous knowledge and experience.
When handling time series data in your Data Science analysis work, a variety of common mistakes are made that are basic, but very important, to the processing of this type of data. Here, we review these issues and recommend the best practices.
Introduction to Computational Thinking with Julia, with Applications to Modeling the COVID-19 Pandemic is another freely-available offering from MIT’s Open Courseware.
Also: Accelerated Natural Language Processing: A #Free Amazon #MachineLearning University Course; Essential data science skills that no one talks about; U.S. election maps are wildly misleading, so this designer fixed them; Top Certificates and Certifications in #Analytics, #DataScience, #MachineLearning and AI
Emerge with Resiliency 2020 is a no-cost virtual event presented by the IBM Planning Analytics and Cognos Community taking place on Nov 18. This one-day event includes 8 expert sessions, during which you’ll learn how IBM solutions can help enhance business continuity, reduce risk from emerging threats, and help you prepare for and manage disruption.
For calculating distances KNN uses a distance metric from the list of available metrics. Read this article for an overview of these metrics, and when they should be considered for use.
Are you feeling fresh now? If anyone landed on this page directly then wait you will have to read the first and second part of this series to get the idea of what’s going on here 🙂
Part 1 — Creating ML model for News ClassificationLink
Part 2 — Creating News Classification Django App ( Part 1) Link
Now let’s go wild. We are going to code the backend of our small mini news classifier website. Here we go 🙂
Now as we have made our homepage frontend time to think about how to send out data that we type or copy-paste in our text area will go to the backend so that we can use our saved model to predict the news category?
We are going to use the GET Method which helps to send our data from our homepage to the backend python file name views.py. For those who are hearing GET the first time it is actually a method that helps to send data to the server from the homepage(called client in networking terms) and vice versa or in other words you can say that it works as a request-response protocol between a client and server.
Machine Learning Jobs
There is also a method name POST and I think you heard or know about it already. So the main difference between GET and POST is that the POST method is more safe and secure because if you send anything using the GET method, it appends your data into a URL which is visible to anyone who is using the browser but in the POST method you can’t see your data in your URL. So POST methods are generally used to send more secure data like Password etc. But you can use any method you like. It’s up to you.
You can see that I am using GET to send data to views.py but we should also define something at views.py to receive it and as the action is sending to classify. So it means that we should define a function in views.py named classify and then accept the data that is sent from the client(homepage) to the server.
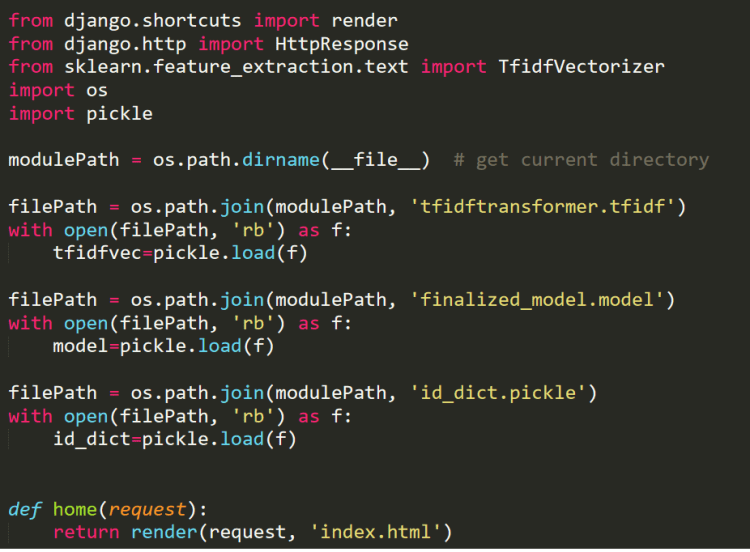
But before that, we also need to load our save model, tfidf transformer, and id_to_label dictionary. So first copy the three files that are already created in the first part to the “newsclassifier” folder in which views.py is present and add the following code in views.py.
Load your model,tf-idf transformer and dictionary
This will load all the above files.
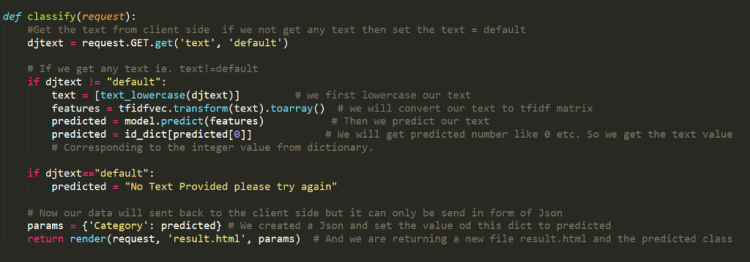
Now it’s time to GET the text at the server-side and predict the results.
First, create a text_lowercase function in views.py which will help to convert all the text into lowercase. And then add the below code in your views.py.
def text_lowercase(text):
    return text.lower()
Create classify function in views.py
I have already commented on each line of code to explain what is going on here so please give it a read.
Now as we see that we are sending the result to a new HTML file that is going to open when we click our submit button of the homepage because we are calling the function “classify” while clicking it and this function is returning “results.html”. So we need to create this HTML too.
Also as we are sending data from our server to the client-side. And every time we paste news and click submit, the value of the category will change. So it is a kind of dynamic changing variable sent from classy function in views.py to result.html. So instead of adding any hardcoded text in result.html we will send the predicted class in form of JSON to results.html and we use a special type of templating in an HTML file which is called Jinja templating to access that JSON value.
Here we are sending only one key named Category and it contains only one value that is predicted, class. So we need to write the below code in our HTML to access this key value.
Create a new file with the name of result.html and paste the above link code in it and this file should be present in the template folder that we have created earlier.
Note — I have added a back button to the result.html because if you want to predict another news you go back to the homepage by clicking it.
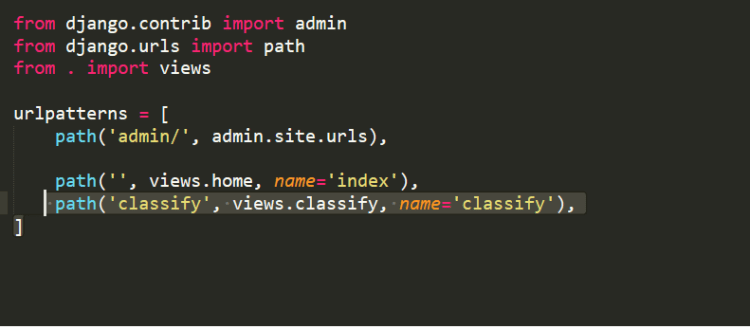
Now everything is nearly set. The only thing we need to do is register a URL to urls.py because remember when we click something present on the homepage(button here). It will go to a new page result.html for which we require a URL.
page in which our result will be shown because this URL taking the output from the classify function in views.py which is returning predict.html.
Now save this urls.py. Everything is ready now to run on your local device.
So just run your server again by writing in conda terminal and paste the local link in your browser. You will see your homepage.
python manage.py runserver
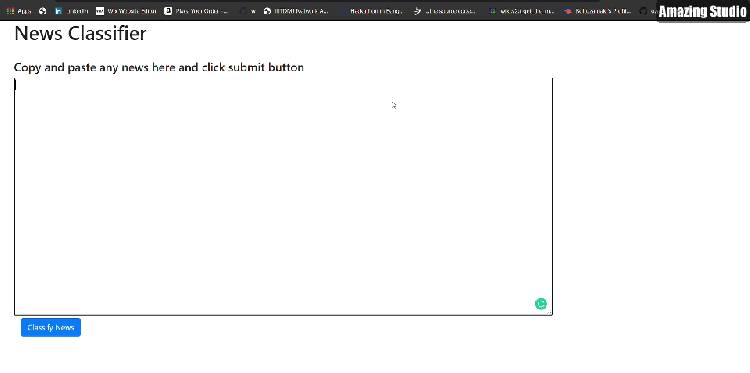
Now you just have to go to google or inshorts.com which contains short news and copy any news text andpaste it into the text area of your homepage. And then click Classify News Button.
BAAM !!! A GIF defines million words 🙂
Our site is working now on local machine
Thanks for bearing with me till now 🙂
Now we have to do only one small step to make this local news classification website go live on WWW.
And wait wait wait ! before moving on further if you like this article then you can give me a clap 🙂 and I am thinking to create many articles on real Web deployment projects in the field of ML, CV, and Reinforcement learning. So if you do not want to miss them. Follow me and stay tuned 🙂
Appreciating the process you must work through for any Data Science project is valuable before you land your first job in this field. With a well-honed strategy, such as the one outlined in this example project, you will remain productive and consistently deliver valuable machine learning models.
New book, “Deep Learning Design Patterns” presents deep learning models in a unique-but-familiar new way: as extendable design patterns you can easily plug-and-play into your software projects. Use code kdmath50 to save 50% off.