How to automatically deskew (straighten) a text image using OpenCV

Today I would like to share with you a simple solution to image deskewing problem (straightening a rotated image). If you’re working on anything that has text extraction from images — you will have to deal with image deskewing in one form or another. From camera pictures to scanned documents — deskewing is a mandatory step in image pre-processing before feeding the cleaned-up image to an OCR tool.

As I myself was learning and experimenting with image processing in OpenCV, I found that in the majority of tutorials you just get a copy-pasted code solution, with barely any explanation of the logic behind it. That’s just not right. We need to understand the algorithms and how we can combine various image transformations to solve a given problem. Otherwise we won’t make any progress as software engineers. So in this tutorial I will try to keep the code snippets to bare minimum, and concentrate on explaining the ideas that make it work. But don’t worry, you can always find the complete code in my GitHub repo by the link at the end of this article.

Deskewing algorithm

Let’s start by discussing the general idea of deskeweing algorithm. Our main goal will be splitting the rotated image into text blocks, and determining the angle from them. To give you a detailed break-down of the approach that I’ll use:

  1. Per usual — convert the image to gray scale.
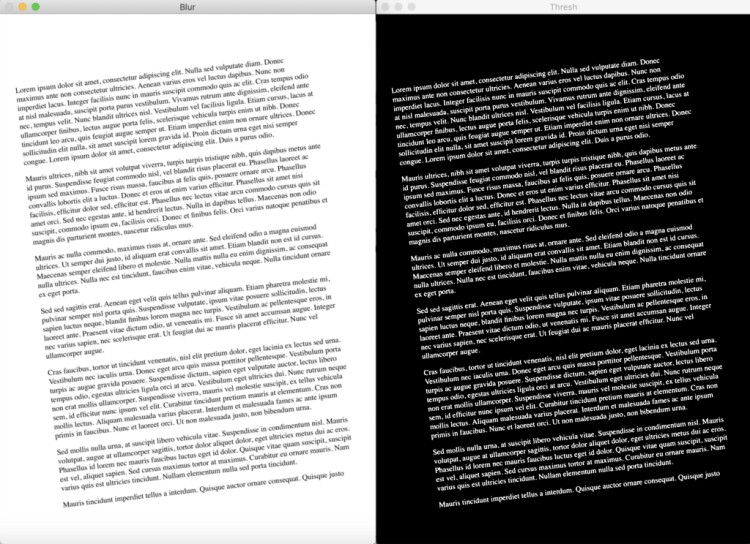
  2. Apply slight blurring to decrease noise in the image.
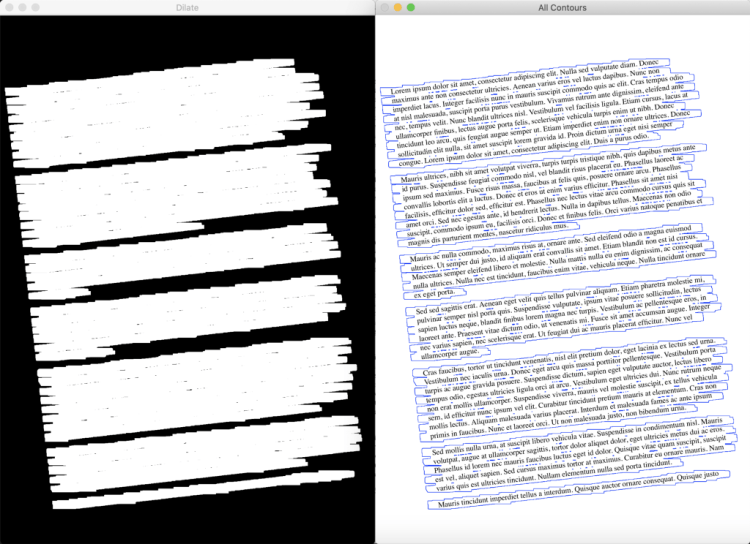
  3. Now our goal is to find areas with text, i.e. text blocks of the image. To make text block detection easier we will invert and maximize the colors of our image, that will be achieved via thresholding. So now text becomes white (exactly 255,255,255 white), and background is black (same deal 0,0,0 black).
  4. To find text blocks we need to merge all printed characters of the block. We achieve this via dilation (expansion of white pixels). With a larger kernel on X axis to get rid of all spaces between words, and a smaller kernel on Y axis to blend in lines of one block between each other, but keep larger spaces between text blocks intact.
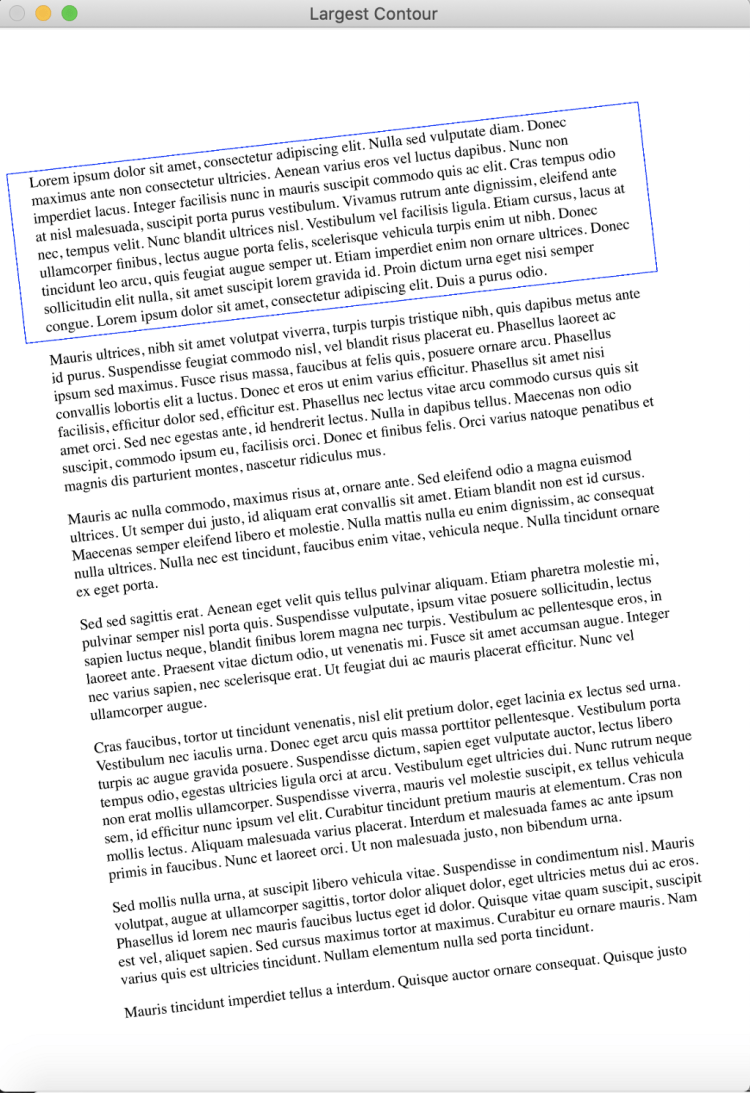
  5. Now a simple contour detection with min area rectangle enclosing our contour will form all the text blocks that we need.
  6. There can be various approaches to determine skew angle, but we’ll stick to the simple one — take the largest text block and use its angle.

And now switching to python code:

# Calculate skew angle of an image
def getSkewAngle(cvImage) -> float:
# Prep image, copy, convert to gray scale, blur, and threshold
newImage = cvImage.copy()
gray = cv2.cvtColor(newImage, cv2.COLOR_BGR2GRAY)
blur = cv2.GaussianBlur(gray, (9, 9), 0)
thresh = cv2.threshold(blur, 0, 255, cv2.THRESH_BINARY_INV + cv2.THRESH_OTSU)[1]

# Apply dilate to merge text into meaningful lines/paragraphs.
# Use larger kernel on X axis to merge characters into single line, cancelling out any spaces.
# But use smaller kernel on Y axis to separate between different blocks of text
kernel = cv2.getStructuringElement(cv2.MORPH_RECT, (30, 5))
dilate = cv2.dilate(thresh, kernel, iterations=5)

# Find all contours
contours, hierarchy = cv2.findContours(dilate, cv2.RETR_LIST, cv2.CHAIN_APPROX_SIMPLE)
contours = sorted(contours, key = cv2.contourArea, reverse = True)

# Find largest contour and surround in min area box
largestContour = contours[0]
minAreaRect = cv2.minAreaRect(largestContour)

# Determine the angle. Convert it to the value that was originally used to obtain skewed image
angle = minAreaRect[-1]
if angle < -45:
angle = 90 + angle
return -1.0 * angle

Trending AI Articles:

1. Microsoft Azure Machine Learning x Udacity — Lesson 4 Notes

2. Fundamentals of AI, ML and Deep Learning for Product Managers

3. Roadmap to Data Science

4. Work on Artificial Intelligence Projects

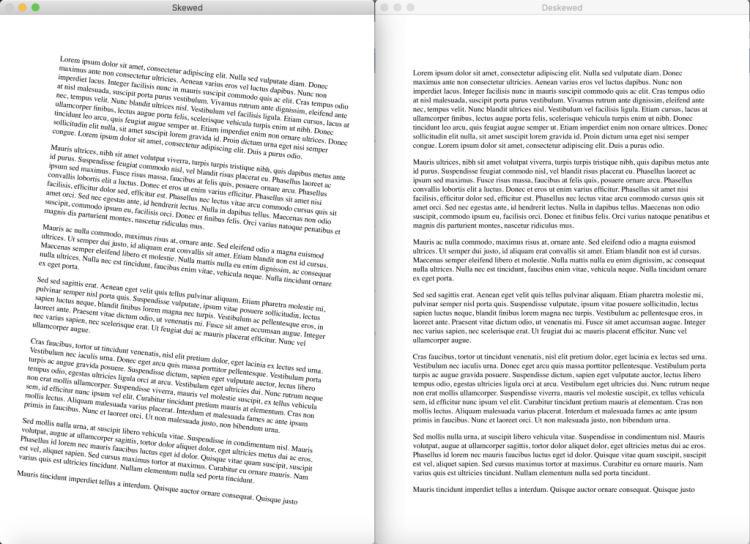
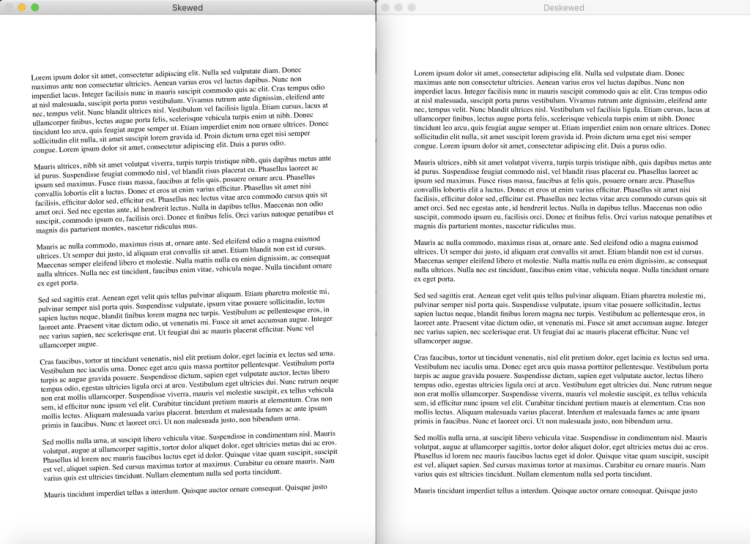
After the skew angle is obtained we just need to re-rotate our image:

# Rotate the image around its center
def rotateImage(cvImage, angle: float):
newImage = cvImage.copy()
(h, w) = newImage.shape[:2]
center = (w // 2, h // 2)
M = cv2.getRotationMatrix2D(center, angle, 1.0)
newImage = cv2.warpAffine(newImage, M, (w, h), flags=cv2.INTER_CUBIC, borderMode=cv2.BORDER_REPLICATE)
return newImage

# Deskew image
def deskew(cvImage):
angle = getSkewAngle(cvImage)
return rotateImage(cvImage, -1.0 * angle)

Visualizing the steps

Blur and threshold applied to the image
Dilation and contour detection of text blocks
Largest text block determined, and wrapped in a min-area rectangle
Original, skewed image (on the left) compared to deskewed result (on the right)
Big Data Jobs

Side note on angle calculation

Your case may require more advanced calculation than just taking the largest block, and there are a few alternative strategies you can start experimenting with.

1 — You can use the average angle of all text blocks:

allContourAngles = [cv2.minAreaRect(c)[-1] for c in contours]
angle = sum(allContourAngles) / len(allContourAngles)

2 — You can take the angle of the middle block:

middleContour = contours[len(contours) // 2]
angle = cv2.minAreaRect(middleContour)[-1]

3 — You can try the average angle of largest, smallest and middle blocks.

largestContour = contours[0]
middleContour = contours[len(contours) // 2]
smallestContour = contours[-1]
angle = sum([cv2.minAreaRect(largestContour)[-1], cv2.minAreaRect(middleContour)[-1], cv2.minAreaRect(smallestContour)[-1]]) / 3

That’s just some of the alternative ways I can instantly think of. Continue experimenting and find what works best for your case!

Testing

To test this approach I used a newly generated PDF file, with Lorem Ipsum text in it. The first page of this document was rendered with 300 DPI resolution (the most common setting when working with PDF documents). After that the testing dataset of 20 sample images was generated by taking the original image and randomly rotating it in the range from -10 to +10 degrees. Then I saved the images together with their skew angles. You can find all the code used to generate these sample images in my GitHub repo, I won’t go over it in detail here.

A sample statistics of testing results:

Item #0, with angle=1.77, calculated=1.77, difference=0.0%
Item #1, with angle=-1.2, calculated=-1.19, difference=0.83%
Item #2, with angle=8.92, calculated=8.92, difference=0.0%
Item #3, with angle=8.68, calculated=8.68, difference=0.0%
Item #4, with angle=4.83, calculated=4.82, difference=0.21%
Item #5, with angle=4.41, calculated=4.4, difference=0.23%
Item #6, with angle=-5.93, calculated=-5.91, difference=0.34%
Item #7, with angle=-3.32, calculated=-3.33, difference=0.3%
Item #8, with angle=6.53, calculated=6.54, difference=0.15%
Item #9, with angle=-2.66, calculated=-2.65, difference=0.38%
Item #10, with angle=-2.2, calculated=-2.19, difference=0.45%
Item #11, with angle=-1.42, calculated=-1.4, difference=1.41%
Item #12, with angle=-6.77, calculated=-6.77, difference=0.0%
Item #13, with angle=-9.26, calculated=-9.25, difference=0.11%
Item #14, with angle=4.36, calculated=4.35, difference=0.23%
Item #15, with angle=5.49, calculated=5.48, difference=0.18%
Item #16, with angle=-4.54, calculated=-4.55, difference=0.22%
Item #17, with angle=-2.54, calculated=-2.54, difference=0.0%
Item #18, with angle=4.65, calculated=4.66, difference=0.22%
Item #19, with angle=-4.33, calculated=-4.32, difference=0.23%
Min Error: 0.0%
Max Error: 1.41%
Avg Error: 0.27%

As you can see this approach works quite well, resulting in only minor digressions from the real skew angle. Such errors are no longer noticeable for the human eye and OCR engines.

Test case 1
Test case 2

That’s it for today! You can apply the solution I described to most deskewing cases, especially the ones that deal with scanned document processing. But again, every problem is unique, so take this as a starting point and improve upon these basic ideas.

Thank you all for reading this tutorial, I hope you found something useful in it. Good luck out there!

GitHub repo with source code:

JPLeoRX/opencv-text-deskew

Don’t forget to give us your ? !


How to automatically deskew (straighten) a text image using OpenCV was originally published in Becoming Human: Artificial Intelligence Magazine on Medium, where people are continuing the conversation by highlighting and responding to this story.

Via https://becominghuman.ai/how-to-automatically-deskew-straighten-a-text-image-using-opencv-a0c30aed83df?source=rss—-5e5bef33608a—4

source https://365datascience.weebly.com/the-best-data-science-blog-2020/how-to-automatically-deskew-straighten-a-text-image-using-opencv

Feature Engineering for Numerical Data

Data feeds machine learning models, and the more the better, right? Well, sometimes numerical data isn’t quite right for ingestion, so a variety of methods, detailed in this article, are available to transform raw numbers into something a bit more palatable.

Originally from KDnuggets https://ift.tt/2RhQYiU

source https://365datascience.weebly.com/the-best-data-science-blog-2020/feature-engineering-for-numerical-data

An Introduction to NLP and 5 Tips for Raising Your Game

This article is a collection of things the author would like to have known when they started out in NLP. Perhaps it will be useful for you.

Originally from KDnuggets https://ift.tt/2GH8Y4b

source https://365datascience.weebly.com/the-best-data-science-blog-2020/an-introduction-to-nlp-and-5-tips-for-raising-your-game

YOLO: Object Detection in Images and Videos

In another post, we explained how to apply Object Detection in Tensorflow. In this post, we will provide some examples of how you can apply Object Detection using the YOLO algorithm in Images and Videos. For our example, we will use the ImageAI Python library where with a few lines of code we can apply object detection.

Object Detection in Images

Below we represent the code for Object Detection in Images.

from imageai.Detection import ObjectDetection
import os
execution_path = os.getcwd()
detector = ObjectDetection()
detector.setModelTypeAsYOLOv3()
detector.setModelPath( os.path.join(execution_path , "yolo.h5"))
detector.loadModel()
detections = detector.detectObjectsFromImage(input_image=os.path.join(execution_path , "cycling001.jpg"), output_image_path=os.path.join(execution_path , "new_cycling001.jpg"), minimum_percentage_probability=30)
for eachObject in detections:
    print(eachObject["name"] , " : ",    eachObject["percentage_probability"], " : ", eachObject["box_points"] )
print("--------------------------------")

And we get:

car  :  99.66793060302734  :  [395, 248, 701, 405]
--------------------------------
bicycle : 66.10226035118103 : [81, 270, 128, 324]
--------------------------------
bicycle : 99.86441731452942 : [242, 351, 481, 570]
--------------------------------
person : 99.92108345031738 : [269, 186, 424, 540]
--------------------------------

We also represent the Original and the Detected Image

Notice that it was able to detect the bicycle behind-A-M-A-Z-I-N-G!!!

ML Jobs

Let’s provide another example of the Original and the Detected image

Notice that it detected the bed, the laptop and the two persons!

Trending AI Articles:

1. Microsoft Azure Machine Learning x Udacity — Lesson 4 Notes

2. Fundamentals of AI, ML and Deep Learning for Product Managers

3. Roadmap to Data Science

4. Work on Artificial Intelligence Projects

Object Detection in Videos

Assume that you have a video in your PC called “Traffic.mp4”, then by running this code you will be able to get the detected objects:

from imageai.Detection import VideoObjectDetection
import os
execution_path = os.getcwd()
detector = VideoObjectDetection()
detector.setModelTypeAsYOLOv3()
detector.setModelPath( os.path.join(execution_path , "yolo.h5"))
detector.loadModel()
video_path = detector.detectObjectsFromVideo(input_file_path=os.path.join(execution_path, "Traffic.mp4"),
output_file_path=os.path.join(execution_path, "New_Traffic")
, frames_per_second=20, log_progress=True)
print(video_path)

And the detected video is here:

Let’s provide another example of a Video:

Object Detection using your Camera

The following examples show how we can use our USB camera for Object Detection:

from imageai.Detection import VideoObjectDetection
import os
import cv2
execution_path = os.getcwd()
camera = cv2.VideoCapture(0)
detector = VideoObjectDetection()
detector.setModelTypeAsYOLOv3()
detector.setModelPath(os.path.join(execution_path , "yolo.h5"))
detector.loadModel()
video_path = detector.detectObjectsFromVideo(camera_input=camera,
output_file_path=os.path.join(execution_path, "camera_detected_video")
, frames_per_second=20, log_progress=True, minimum_percentage_probability=30)
print(video_path)

Below I represent just a snapshot of the recorded video of my office while I was coding. As you can see it was able to detect the books of the library behind me!

Don’t forget to give us your ? !


YOLO: Object Detection in Images and Videos was originally published in Becoming Human: Artificial Intelligence Magazine on Medium, where people are continuing the conversation by highlighting and responding to this story.

Via https://becominghuman.ai/yolo-object-detection-in-images-and-videos-7a5ae09a69b4?source=rss—-5e5bef33608a—4

source https://365datascience.weebly.com/the-best-data-science-blog-2020/yolo-object-detection-in-images-and-videos

Image Stream Processing in Flutter application by TFLite Neural Networks

Camera image stream processing problem

Camera is a nice plugin to access hardware cameras, take some pictures and save them in a memory, while camera streaming is very heavy and quite efficient only on a medium quality level. It might be enough in some cases, but when resolution matters, streams can lag and slow down until app die. The reason is very simple: streams push huge amounts of data into each frame in the main thread. How to move those in a separate thread?

  • You need to register separate isolates, register plugins in those isolates and somehow handle a memory. I find it tricky.
  • Another solution is to write your own plugin with access to camera, handle camera streams in Android and iOS threads, and push some results on top. This is also not the easiest solution.

So I decided to work on third solution, easier and less time consuming.

Possible solution, or my own ‘wheel’

Depending on a task and requirements, there is a solution which might cause some ‘freezing’ issues, but in the end its overall result generally satisfies the requirements. When resolution matters and image update frequency is not so important (for example, from three to five frames in a second are acceptable), you can pick frames from camera, process them, show results, and perform all these steps in a cycle.

ML Jobs

Some common camera configurations

To make this app work with a camera, first it needs to be configured. A camera controller is configured as shown or as you wish, according to your requirements, and followed by camera plugin samples.

Image capturing is also simple. Provide image url. Take a picture (frame) and save it. Here you could see some pieces of BLoC events triggering:

While the main frame picking logic is here:

I have also added some kind of cache to save 10 latest frames for processing and cleaning operation to be performed in a separate isolate. You could find that in a sample application.

Trending AI Articles:

1. Microsoft Azure Machine Learning x Udacity — Lesson 4 Notes

2. Fundamentals of AI, ML and Deep Learning for Product Managers

3. Roadmap to Data Science

4. Work on Artificial Intelligence Projects

Flutter widgets, building prerequisites

To work properly with a camera and a memory, some more configurations are required. I have used the permission handler plugin wrapped in Permissions BLoC to handle all this stuff, also connected to Lifecycle BLoC to stop the processes when the app is in background (collapsed) and to Cameras BLoC for requesting the available cameras list and update UI, depending on the data. So main detector component functionality is the following:

More detailed functionality could be found in BLoC files.

Detector widget in Component wrapped in MultiBlocProvider with two main BLoCs: Detector and Cropper. They are quite local and should not be used over the application only in this particular part:

More business logic is here

For this application I have used a BLoC architecture solution. While I am a fan of Redux pattern for approaches to split: UI, state storage, state change and business logic, BLoC is still event-driven and quite simple for understanding, based on streams. Some plugins implementing the bloc provide simpler solutions, wrapping all streams handling inside. So i stuck on flutter_bloc. Thanks to Felix Angelov, I was inspired by his talk on Flutter Europe.

The general flow of image detection is shown in this piece of Detector’s BLoC code:

Detailed method explanation will follow.

Responsible for image cropping Cropper BLoC:

For better understanding, the next section contains code examples for all internally-used methods from utils.dart class.

Object detection on ‘image stream’

I had a task to run object detection on a camera stream, draw their frames on a screen, cropp these objects (if needed), and send them to some other component for post processing.

For this task I have checked a few solutions. Firebase ML does not allow using custom-trained models locally, for now. Yes, there is a great article with Firestore, which I have not checked yet.

Models loading

For my first implementation I have used an easier solution on an existing tflite plugin. Pre-trained models for this article application have also been taken from their sample application. It allows loading custom-trained neural networks right from the device. And it worked .

Detection logic

Detection is quite straightforward. For this you need to load the image path to TFLite, and, as a result, get detected objects as a list of coordinate boxes with recognized object labels.

This method is also wrapped into the Exif image rotation function from plugin to get a proper image angle; as I have found out (after some painful debugging), on most devices images are saved with a rotation of 90 degrees.

Object cropping

A simple method to copy bytes from the original image matrix to the resulting image matrix. Pixel by pixel. One by one.

Here you can find _copyCropp method which performs image data copying from original source to cropped destination.

Some pitfalls

While working on the plugin, I have found out that cropped images are always of the same size. I configured the camera controller to get the maximum image size. But it was constantly the same. After some research I found an issue in a camera plugin, which actually returns a high-quality size as upper bound. Surprise )

To get a proper image size, for future boxes displaying on the camera stream, I had to do this:

All these pieces are used one by one, cycled and connected to the application lifecycle.

Results

All described above will lead to the following results:

Working laggy. But image stream itself is even worst

Cropped images look like these ones below. Quality is good enough for some purposes, even if it not perfectly detected/cropped.

Original cropped images

Overall scheme

Please do not be scared at scheme below. It is quite complex, but I tried to show as much as possible to give the understanding of the full flow of events.

Hope it is clear

Code sample

All sample application code is provided and could be found here:

VadPinchuk/flutter_detector

I highly recommend to check if all plugin requirements are implemented, to be on the safe side. It can be not configured for iOS, but it will work on it, as my original project showed.

Summary

As you can see from a gif (video) or from an application that you could build from the provided code sample, this solution is not perfect. It still requires some optimisation and simplification. Some improvements could also be done by moving separate logic to isolates. In general, however, this solution works much better than the camera stream itself. And for now, it can be applied for some purposes.

I hope you liked this article and it could be useful for you.

Thank you for your time.

Don’t forget to give us your ? !


Image Stream Processing in Flutter application by TFLite Neural Networks was originally published in Becoming Human: Artificial Intelligence Magazine on Medium, where people are continuing the conversation by highlighting and responding to this story.

Via https://becominghuman.ai/image-stream-processing-in-flutter-application-by-tflite-neural-networks-2c40d65f3b67?source=rss—-5e5bef33608a—4

source https://365datascience.weebly.com/the-best-data-science-blog-2020/image-stream-processing-in-flutter-application-by-tflite-neural-networks

6 Common Mistakes in Data Science and How To Avoid Them

As a novice or seasoned Data Scientist, your work depends on the data, which is rarely perfect. Properly handling the typical issues with data quality and completeness is crucial, and we review how to avoid six of these common scenarios.

Originally from KDnuggets https://ift.tt/2FllZji

source https://365datascience.weebly.com/the-best-data-science-blog-2020/6-common-mistakes-in-data-science-and-how-to-avoid-them

Design a site like this with WordPress.com
Get started